Emergency exit sign rules aren't just suggestions. They are strict, non-negotiable legal requirements from groups like OSHA and the NFPA, built to create a clear, visible path to safety when it matters most. Think of proper compliance as a critical lifeline—it directly impacts whether people get out safely, cuts down evacuation times, and shields building owners from massive legal and financial trouble.
Why Exit Sign Compliance Is Not Optional
Picture this: a fire alarm shrieks through a busy office building. Smoke starts clouding the hallways, sparking panic and confusion. In that high-stakes moment, everyone is looking for one thing: a clear, lit-up path to safety.
If the exit signs are broken, hidden, or dark, that chaos only gets worse. This scenario drives home a simple but vital truth: emergency exit signage is an absolute must-have for building safety.
These signs are far more than a box to check for an inspector. They are the backbone of any solid evacuation plan, turning a potential disaster into an orderly exit. Regulatory bodies like the Occupational Safety and Health Administration (OSHA) and the National Fire Protection Association (NFPA) have created detailed codes for exactly this reason. Their rules are built to create an unmistakable visual language that anyone can follow when every second is critical.
The Real Cost of Non-Compliance
Ignoring these rules comes with heavy consequences that go way beyond a failed inspection. A single slip-up can lead to steep fines, jacked-up insurance premiums, and, worst of all, tragedies that could have been prevented. The buck stops with building owners and facility managers to make sure every single sign is in its place, working perfectly, and correctly installed.
This infographic breaks down the key authorities, the proven impact of compliant signs, and the serious penalties for cutting corners.
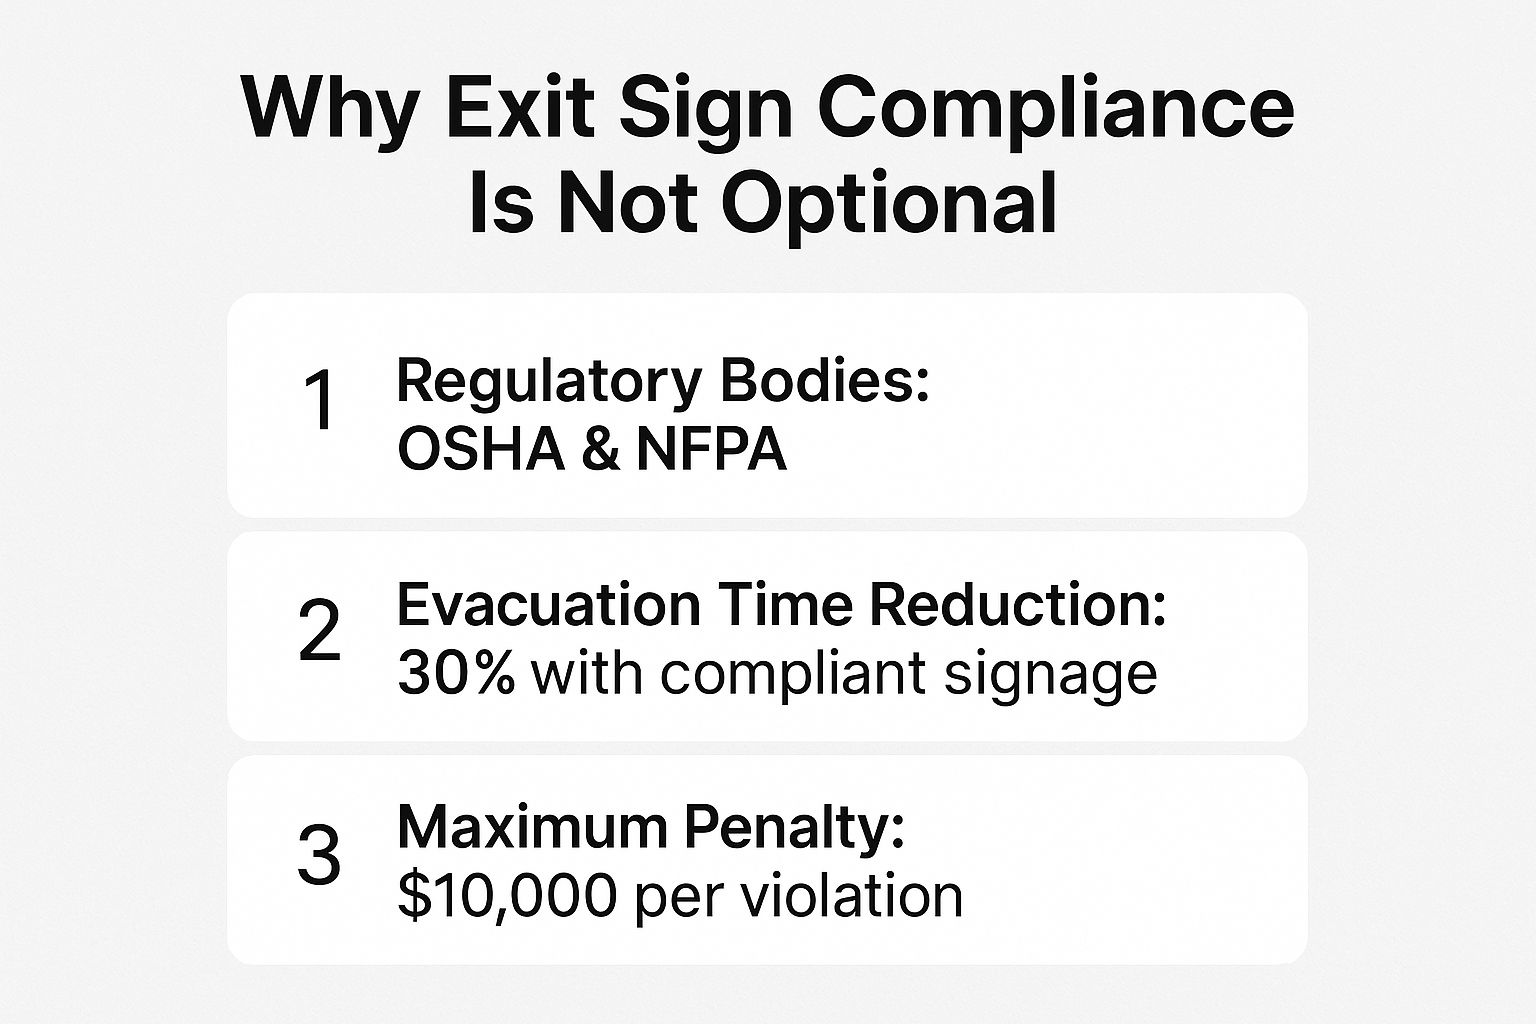
As the data shows, following the standards set by OSHA and the NFPA isn't just about dodging fines; it’s a proven way to make evacuations dramatically more efficient. To see how exit signs fit into the bigger picture, it helps to understand the essential emergency evacuation procedures for the workplace.
At the end of the day, the right mindset is to see compliance as a core duty to protect human life. These signs are just one piece of the puzzle, and you can learn more about the different types of commercial signs that create a safe, well-run facility.
Decoding Key Regulations from OSHA and NFPA
Trying to get a handle on emergency exit sign requirements can feel like you’re reading a foreign language. There are multiple organizations making the rules, and it’s not always clear who’s in charge of what. The first step to getting it right in your facility is understanding the key players: OSHA, the NFPA, and the authorities using the International Building Code (IBC).
Think of it this way: The Occupational Safety and Health Administration (OSHA) is laser-focused on protecting employees on the job. Their rules are federal law, designed to keep people safe in their specific work environment, whether that’s an office park or a busy warehouse.
The National Fire Protection Association (NFPA), on the other hand, thinks bigger. Their famous NFPA 101, also known as the Life Safety Code, is all about protecting the general public inside almost any building you can imagine. While NFPA codes aren't laws on their own, they are the foundation for most state and local fire codes, which makes them very much enforceable.
Distinguishing Between Key Authorities
The International Building Code (IBC) works a lot like the NFPA, setting wide-ranging standards for building safety that local governments adopt into their own laws. The main thing to remember is that even though their missions are slightly different, their rules for exit signs usually overlap to create one cohesive standard for safety.
These standards don't just exist in a vacuum. They mandate that every exit sign has to be visible, well-lit, and placed in a way that clearly guides people to safety during an emergency. It's a system built for clarity under pressure.
Actionable Insight: Who do you listen to—OSHA or the NFPA? The answer is simple: follow the strictest rule that applies to you. Your local fire marshal is almost always enforcing a version of the NFPA or IBC codes, so starting there is your best bet for compliance.
Of course, a safe escape route needs more than just signs. Doors along the path have to be equipped with the right hardware, like panic hardware, such as a single panic bolt, to ensure people can get out quickly without fumbling with locks or needing special instructions.
Core Requirements at a Glance
To make sense of all this, it helps to see the core requirements laid out side-by-side. Here’s a quick-reference table that breaks down the main focus of each authority.
Key Regulatory Requirements at a Glance
This table summarizes the core mandates for emergency exit signage from the three main governing bodies, highlighting their primary areas of focus.
| Regulatory Body | Primary Focus Area | Key Requirement Example |
|---|---|---|
| OSHA | Employee Safety in the Workplace | Mandates that all exits are clearly marked with a sign reading "Exit" and that pathways to exits are unobstructed. |
| NFPA 101 | Public Safety & Building Egress | Specifies sign illumination levels, requiring signs to be lit and have a 90-minute emergency power backup. |
| International Building Code (IBC) | New Construction & Major Renovations | Sets standards for sign placement, letter height (minimum of 6 inches), and stroke width for maximum visibility. |
Understanding these basics is also a critical part of the process covered in our guide to sign permit requirements.
Ultimately, all these regulations weave together to create a powerful safety net. OSHA protects employees during their daily routines, while the NFPA and IBC make sure the building itself is ready for a safe escape for everyone inside. Knowing how each piece fits helps you build a smarter, fully compliant safety plan.
Mastering Sign Design and Visibility Standards
An emergency exit sign is useless if people can't see it and understand it in a split second. That challenge gets even harder when smoke, darkness, or sheer panic clouds their judgment. The design standards for these signs aren’t just arbitrary rules; they're rooted in the science of how we process information under extreme stress.
Think of it this way: you need to be able to read a license plate from a distance to identify a car. An exit sign works on the same principle. It must be instantly legible from up to 100 feet away—a standard set by codes like NFPA 101. This ensures that someone at the far end of a long corridor can immediately spot their path to safety without a moment's hesitation.

The Anatomy of a Legible Exit Sign
To hit that level of clarity, regulatory bodies have laid out strict, non-negotiable rules for the sign's core design. These aren't just suggestions; they are enforceable standards that every single sign has to meet.
The key design specs include:
- Letter Height: The letters in "EXIT" must stand at least 6 inches tall. This isn't a random number; it's the proven minimum height for readability at 100 feet.
- Stroke Width: Each line making up the letters has to be a minimum of 3/4 of an inch thick. This keeps the letters from blurring together, especially from a distance or in smoky conditions.
- Letter Spacing: A gap of at least 3/8 of an inch is required between each letter. This crucial bit of spacing prevents the letters from bleeding into one another and becoming an unreadable blob.
These precise measurements all work together to make the word "EXIT" unmistakable, even for someone with impaired vision or in a state of panic.
Why Color Contrast Is Critical
Beyond size and shape, color is one of the fastest ways to communicate a message. For exit signs, high contrast is an absolute must. The two most common—and approved—color schemes are bright red or vivid green letters set against a contrasting background, usually white.
The choice between red and green often boils down to local codes and even a little bit of psychology. Red is a classic warning color that grabs our attention, while green is universally understood to mean "go" or "safe." Both are incredibly effective, as long as they create a sharp, undeniable visual break from their surroundings.
Practical Example: A sign with faded red letters on a dingy, off-white background might technically exist, but it fails the most important test: can you spot it instantly? High contrast cuts through the visual noise and pulls the eye right where it needs to go.
This same principle of visibility applies to more than just safety signs. Business owners can explore various types of outdoor business signs that lean on smart design to capture attention and bring in customers.
Using Directional Indicators Correctly
What happens when the path to safety isn't a straight shot? That's where directional indicators, or chevrons, come in. These arrows are a vital part of the design, pointing people clearly toward the direction of travel.
Here’s a practical example of how this plays out in the real world:
- The Scenario: Someone is in a long office hallway. The nearest exit is not straight ahead, but down another corridor to their left.
- The Wrong Sign: An "EXIT" sign with no arrow is hanging at the T-intersection. This creates deadly confusion. Is the exit to the left? The right? Straight through a wall?
- The Right Sign: An "EXIT" sign with a bold chevron pointing left is installed. Now, the path is instantly clear. It eliminates guesswork and shaves precious seconds off evacuation time.
By mastering these fundamental design and visibility standards, you ensure your signs do more than just check a box on a fire marshal's list. You provide a clear, unambiguous beacon of safety for every single person in your building.
Understanding Illumination and Power Requirements
When the lights go out, an emergency exit sign has one job: to be the beacon that guides people to safety. If it’s not lit, it’s just a piece of plastic on the wall. That’s why the codes governing how these signs are powered and illuminated are so incredibly strict.
Think of an exit sign’s power source as its life insurance policy. Day-to-day, most signs are wired directly into the building's main electrical system. But the real test comes when that primary power gets cut.
The Mandatory 90-Minute Battery Backup
According to NFPA 101, every single electrically powered exit sign needs a reliable backup. In nearly every case, this means a built-in, rechargeable battery.
This isn’t just any old battery, either. It must have enough juice to keep the sign lit continuously for a minimum of 90 minutes after a power failure. This 90-minute rule is an absolute, non-negotiable standard. It's designed to give everyone in the building a crucial window to evacuate safely, even if the power outage drags on. The internal mechanics ensure that the second AC power is lost, the DC battery backup kicks in instantly, without a flicker.
Internally vs. Externally Lit Signs
The way a sign is lit is just as important as its power source. Exit signs are typically broken down into two main categories:
- Internally Illuminated Signs: These are what most of us picture. They have a light source—almost always LEDs these days—right inside the housing. The sign itself glows from within, making the word "EXIT" impossible to miss.
- Externally Illuminated Signs: These signs don't light up on their own. Instead, they rely on a dedicated, external light fixture aimed right at them. NFPA 101 mandates that these signs must be lit to a brightness of at least 5 foot-candles (54 lux) on the sign's surface at all times.
Actionable Insight: Whether the light comes from inside or outside, the face of the sign has to be brightly and evenly lit. The goal is simple: no shadows, no dark spots, just a clear, readable sign that can be seen from a distance, even when things get chaotic.
The industry's move toward LEDs is a big deal, not just for their energy savings and long life but also for reliability. Pushed by insurance requirements and a growing focus on public safety, building managers are increasingly swapping out older, less reliable signs. You can explore the latest research on the emergency exit signs market to see how widespread this trend has become.
Photoluminescent Signs: A Power-Free Alternative
For facility managers who want a truly low-maintenance, energy-free solution, photoluminescent signs are a fantastic option. These are the "glow-in-the-dark" signs that work without any electricity or batteries.
How? They’re made with special pigments that absorb energy from the ambient light around them. When the lights go out, they release that stored energy as a bright, steady glow.
Practical Example: How Photoluminescent Signs Work
Picture a school hallway that's brightly lit all day long. A photoluminescent sign mounted there will soak up that light, essentially "charging" itself. If a fire alarm triggers a power cut, that sign instantly becomes a glowing guidepost, leading students and teachers to safety without needing a single wire or battery.
But they aren't a one-size-fits-all solution. To be code-compliant, a photoluminescent sign must be installed in an area that gets at least 5 foot-candles of ambient light on its face during normal hours. This makes them perfect for well-lit corridors and lobbies but totally unsuitable for dimly lit areas where they can’t get a full charge.
Strategic Placement Along Egress Paths
A perfectly designed, brightly lit exit sign is useless if it’s in the wrong spot. Knowing where to place your signs is just as critical as the signs themselves. Think of it this way: strategic placement turns a simple collection of signs into an intuitive navigation system, guiding people to safety from absolutely anywhere in your building.
Imagine the path to an exit—the egress path—is a river. In an emergency, every single person needs to find that river and follow its current to safety. Your exit signs are that current, gently but firmly pulling everyone in the right direction, especially when the path gets confusing.

Mapping the Journey to Safety
The core rule, straight from OSHA 1910.37(b), is that the line of sight to an exit sign must always be clear. If you can’t immediately tell which way to go to find an exit, a sign needs to be there to point the way.
This simple principle locks in a few non-negotiable spots for signs:
- Above All Exit Doors: Every door leading directly outside or into a protected area like a fire-rated stairwell needs a sign right above or beside it. This is the final destination marker.
- At Hallway Intersections: A turn in the hallway or a T-junction creates a moment of choice. A directional sign with a clear arrow is mandatory here to show people which way to go.
- Along Long Corridors: In a long, straight hallway, you can't have people guessing if they're still on the right track. Signs must be placed so that a person is never more than 100 feet away from the nearest one.
Actionable Insight: Eliminate all guesswork. From any point in a common area, a person should be able to look up and instantly see either an exit or a sign telling them exactly how to get to one.
Correct vs. Incorrect Placement Scenarios
Let's ground these rules in the real world with a common office layout.
Scenario A: The T-Intersection
- Incorrect: You place a standard "EXIT" sign with no arrow at the intersection. Someone running down the hall now has to waste precious seconds deciding whether to turn left or right. That hesitation can be dangerous.
- Correct: An "EXIT" sign with a directional arrow (a chevron) is installed, pointing down the correct hallway toward the final exit. It removes all doubt and keeps people moving.
Scenario B: The Misleading Door
- Incorrect: Along the main escape route, there's an unmarked door to a janitor's closet right next to the real exit stairwell. In a smoky, panicked environment, it's easy for someone to make a critical mistake and open the wrong door.
- Correct: That closet door is clearly marked with a sign like "STORAGE" or "NOT AN EXIT". This simple step prevents a time-wasting and potentially tragic error.
ADA Mounting Height Requirements
Modern safety codes are built around accessibility. Your emergency signs are no exception and must comply with the Americans with Disabilities Act (ADA) to ensure they’re effective for everyone, including those with disabilities.
While signs mounted directly above doors have some leeway, any signs placed on walls next to doors have very specific height rules. The baseline of the tactile characters—the raised letters people can feel—must be mounted between 48 inches minimum and 60 inches maximum from the finished floor.
This height ensures the sign is within the line of sight and reach for individuals in wheelchairs and those with visual impairments. By blending the strategic placement required by fire codes with the accessibility standards of the ADA, you create a truly effective egress system that keeps every single person in your building safe.
Your Guide to Inspections and Maintenance
Getting a compliant sign on the wall is just the starting point. The real work is making sure it stays functional, day in and day out. After all, an exit sign with a burnt-out bulb or a dead battery is no more useful than having no sign at all. This is why fire codes don't just see regular inspections as a good idea—they're a legal must.
Think of your exit signs exactly like you think of your smoke detectors. You wouldn't bet your safety on a smoke alarm you haven't tested in years, right? The same logic applies here. Consistent checks are your best insurance that this critical safety gear will work when it matters most, protecting everyone inside and shielding you from serious liability.
The Monthly and Annual Testing Cadence
To keep every sign in ready-to-go condition, the NFPA lays out a simple but non-negotiable testing schedule. These checks are designed to be quick and straightforward enough for any facility manager, but they are absolutely essential for staying compliant.
Here’s the breakdown of what you need to do:
- The 30-Second Monthly Push-Test: Once a month, give each sign a quick check-up. Just press and hold the "test" button on every battery-backed sign for at least 30 seconds. You should see it switch seamlessly to its backup battery power and stay brightly lit. If it flickers, dims, or shuts off, that’s your red flag that something needs fixing.
- The 90-Minute Annual Test: Once a year, it’s time for a much more rigorous test. You’ll need to simulate a real power outage by cutting the main AC power to the signs. They must remain fully illuminated on their own battery power for the full 90-minute duration required by code. This is the ultimate test to confirm the battery has the stamina to last through a prolonged emergency.
And remember, if you didn't write it down, it didn't happen. Keeping a detailed log of these tests is just as crucial as doing them. Note the date, which sign was tested, whether it passed or failed, and what you did to fix any issues. An inspector will ask for this log first thing.
Troubleshooting Common Failure Points
It's not a matter of if a sign will fail a test, but when. The good news is that most problems come from a handful of common, easily fixable issues. Knowing what to look for will help you keep your facility safe and compliant without a lot of headaches.
Actionable Insight: The number one culprit for a failed inspection? An old, expired battery. Most of the sealed lead-acid or nickel-cadmium batteries inside exit signs have a reliable lifespan of about 5 to 7 years. A smart, proactive strategy is to simply replace them every five years to stay ahead of the problem.
Here are a couple of quick troubleshooting tips:
- Sign is Dim or Flickering on Battery: This almost always points to a weak or dying battery that just can't hold a proper charge anymore. The fix is a simple battery replacement.
- Sign is Completely Dark: If the sign doesn't light up at all during a test, check the easy stuff first—the bulbs. If the bulbs look good, you're likely dealing with a completely failed battery or a faulty internal charging circuit, which might mean it's time to replace the whole unit.
Common Questions About Exit Sign Requirements
Even when you have a good handle on the regulations, some practical, real-world questions always seem to pop up. Let's tackle a few of the most common points of confusion facility managers run into, so you can handle your exit signage with confidence.
Do Small Rooms Need an Exit Sign?
This one comes up all the time: does a small office or storage closet with just one door really need an exit sign? The short answer is, not always. If the exit is obvious and the room has very few occupants, codes like NFPA 101 may not require it.
But here’s the catch—this heavily depends on your local rules and the building's overall layout. If there’s any chance the path to safety is unclear, or if a room has more than one door, signs become mandatory. When in doubt, the best move is always to check with your local fire marshal for a final say on your specific space.
Can I Use Only Photoluminescent Signs?
Photoluminescent signs are a fantastic, energy-efficient option, but they aren't a one-size-fits-all solution. They work by absorbing ambient light and glowing in the dark, which means they must be installed in areas with enough consistent light to stay charged, as outlined in UL 924 standards.
If a space is usually dim or completely dark during operating hours, you'll need a traditional electric sign with battery backup. Photoluminescent signs are perfect for well-lit hallways and stairwells, but they can't universally replace electric signs in every situation.
Practical Tip: It's also crucial to know the difference between an "Exit" sign and a directional sign. An "Exit" sign goes directly on a door leading outside or to a protected area like a stairwell. A directional sign, usually with an arrow, is an "Exit Access" sign—it's there to point the way when the final exit isn't in plain sight.
How Often Should I Replace Exit Sign Batteries?
Codes are very clear about monthly and annual testing, but they don't give a hard-and-fast replacement schedule for batteries. A typical exit sign battery will last somewhere between 5 to 7 years, though this varies by model and manufacturer.
The rule of thumb is simple: if a sign can't stay lit for its full 90-minute annual test, the battery needs to be replaced immediately. As a best practice, many savvy facility managers don't wait for a failure. They proactively swap out all batteries every 5 years to guarantee reliability and breeze through inspections.
Trying to master the fine print of safety and compliance signage can be a real challenge, but you don't have to figure it all out on your own. The experts at On Display Signs, Inc. are here to manage the entire process, from design and fabrication to ensuring you meet every local and national code. Elevate your facility’s safety and brand visibility with our comprehensive signage solutions.


