When you want a sign that communicates permanence and quality, nothing beats metal. An engraved metal sign has a weight and presence that plastic or wood just can't match, making it the go-to choice for creating a lasting, professional impression.
But getting the project right starts with one crucial decision: choosing the right metal for the job.
Choosing the Right Foundation for Your Metal Sign
Think of the metal you choose as the foundation of your entire project. It dictates not just how the sign will look on day one, but how it will hold up over years of use, what it will cost, and the overall value it delivers. Instead of just running through a list of specs, let’s look at the three workhorses of the sign industry—aluminum, stainless steel, and brass—through the lens of real-world scenarios.
The first question is always about location. Will the sign live indoors or be exposed to the elements outside? This one decision immediately helps narrow down your best options.
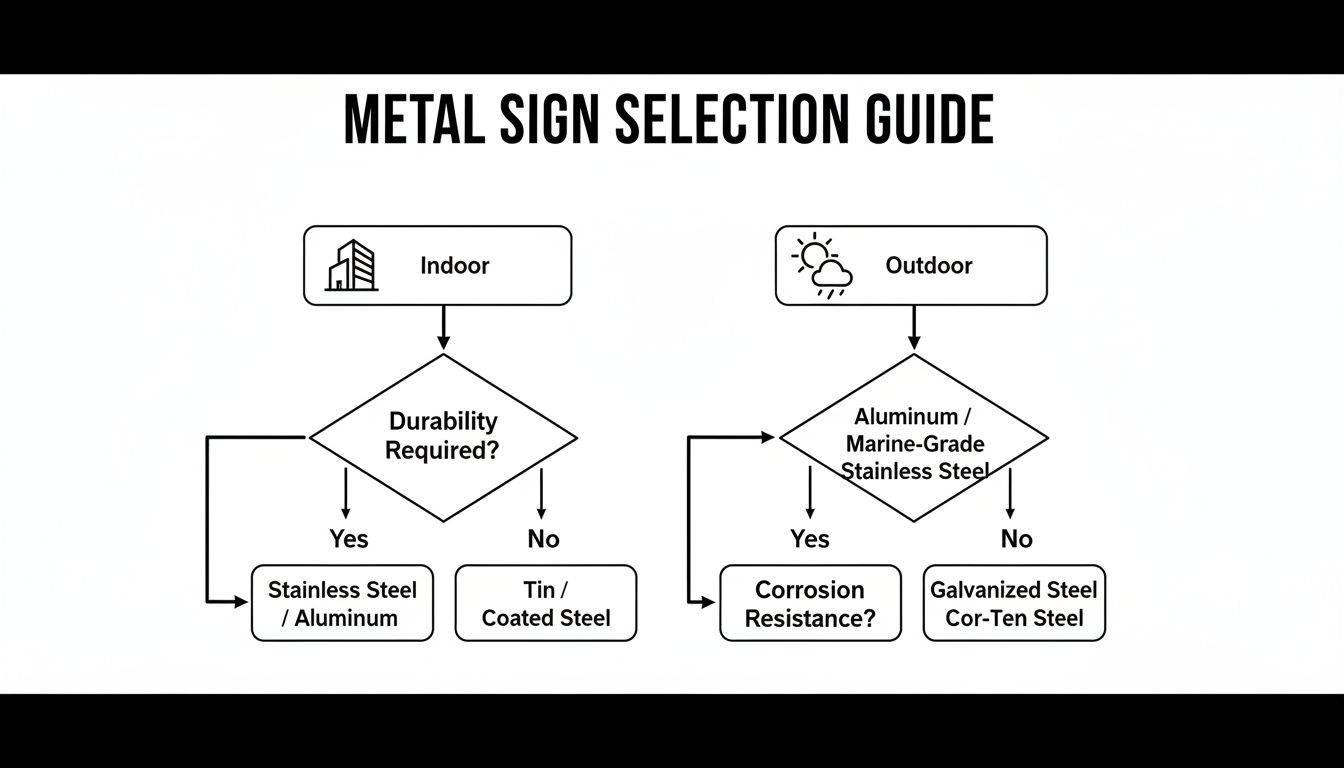
As you can see, figuring out the environment is the perfect starting point for picking a material that will look great for years to come.
Aluminum: The Versatile Champion
Think of aluminum as the all-around athlete of the metal sign world. It’s lightweight, naturally rust-proof, and incredibly versatile, making it a fantastic choice for everything from outdoor wayfinding systems on a corporate campus to sleek interior directory signs.
- Practical Example: A property manager needing to outfit an entire apartment complex with new unit number signs. Anodized aluminum is the perfect fit. It's cost-effective for a large order, it won’t rust in the rain, and it’s light enough for a quick and easy installation. For more heavy-duty outdoor options, check out our guide on exterior sign materials.
Stainless Steel: The Modern Powerhouse
When you need absolute toughness and a clean, modern look, stainless steel is the answer. It’s much heavier and more durable than aluminum, offering serious resistance to scratches, dents, and corrosion, especially in high-traffic areas.
- Practical Example: A new hospital needs its main entrance lettering and lobby signage to project an image of cleanliness, strength, and professionalism. Brushed stainless steel is the obvious choice. It can handle constant touching, is easy to sanitize, and has a sophisticated, contemporary feel that perfectly matches a modern healthcare brand.
Brass: The Classic Statement
For an unmatched feeling of tradition and prestige, nothing compares to brass. Its warm, golden glow instantly communicates a sense of history and importance. While it needs a bit more care to prevent tarnishing (unless it’s protected with a clear coat), no other metal delivers that classic, distinguished look.
- Practical Example: A historic law firm wants to honor its founders with a commemorative plaque in the reception area. Polished brass is the only way to go. The deep, rotary-engraved text and brilliant finish create a timeless piece that speaks to stability and a long-standing reputation.
To make the decision even clearer, here’s a quick head-to-head comparison of these three top contenders.
Metal Sign Material Comparison
| Material | Best For | Durability | Corrosion Resistance | Typical Cost |
|---|---|---|---|---|
| Aluminum | Versatile indoor/outdoor use, cost-effective projects, lightweight needs. | Good | Excellent | $ |
| Stainless Steel | Modern aesthetics, high-traffic areas, maximum durability. | Excellent | Excellent | $$$ |
| Brass | Traditional, prestigious look, commemorative plaques, historic branding. | Very Good | Good (requires coating) | $$$ |
Ultimately, the right metal is the one that aligns with your brand, budget, and the environment where the sign will live. By starting with these three options, you're well on your way to a sign that not only looks great but is built to last.
How Your Message Becomes Permanent: Engraving Methods Explained
Once you’ve picked the perfect metal, the next step is turning that blank canvas into your finished sign. The engraving method is the "how" behind the final look, and it dictates the depth, precision, and overall character of your design.
Think of these methods as different tools in a craftsman's workshop. Each one has its own unique strength for creating a specific effect on your engraved signs metal, and knowing the difference is key to getting the result you want.

Some methods are built for razor-sharp detail, while others excel at creating deep, tactile lettering that will last for decades. Let's break down the most common approaches used by professional sign makers.
Laser Engraving: A Precision Light Beam
Laser engraving is the modern workhorse for achieving incredibly fine detail. Picture a highly focused beam of light that instantly vaporizes a micro-thin layer of the metal's surface, leaving a clean and permanent mark behind. The entire process is computer-controlled, which means it can perfectly replicate complex logos, tiny text, and intricate patterns with surgical precision.
This method doesn't really "carve" the metal in the traditional sense; it alters the surface. The result is a smooth, high-contrast mark that’s incredibly crisp. It’s the perfect choice when absolute visual clarity is your top priority.
Actionable Insight
- When to Ask for It: Your design includes a detailed logo with fine lines, small fonts for industrial ID plates, or QR codes that must be perfectly scannable.
- Best On: Coated or anodized metals like aluminum. The laser removes the top coating to reveal the raw metal underneath, creating a striking visual contrast.
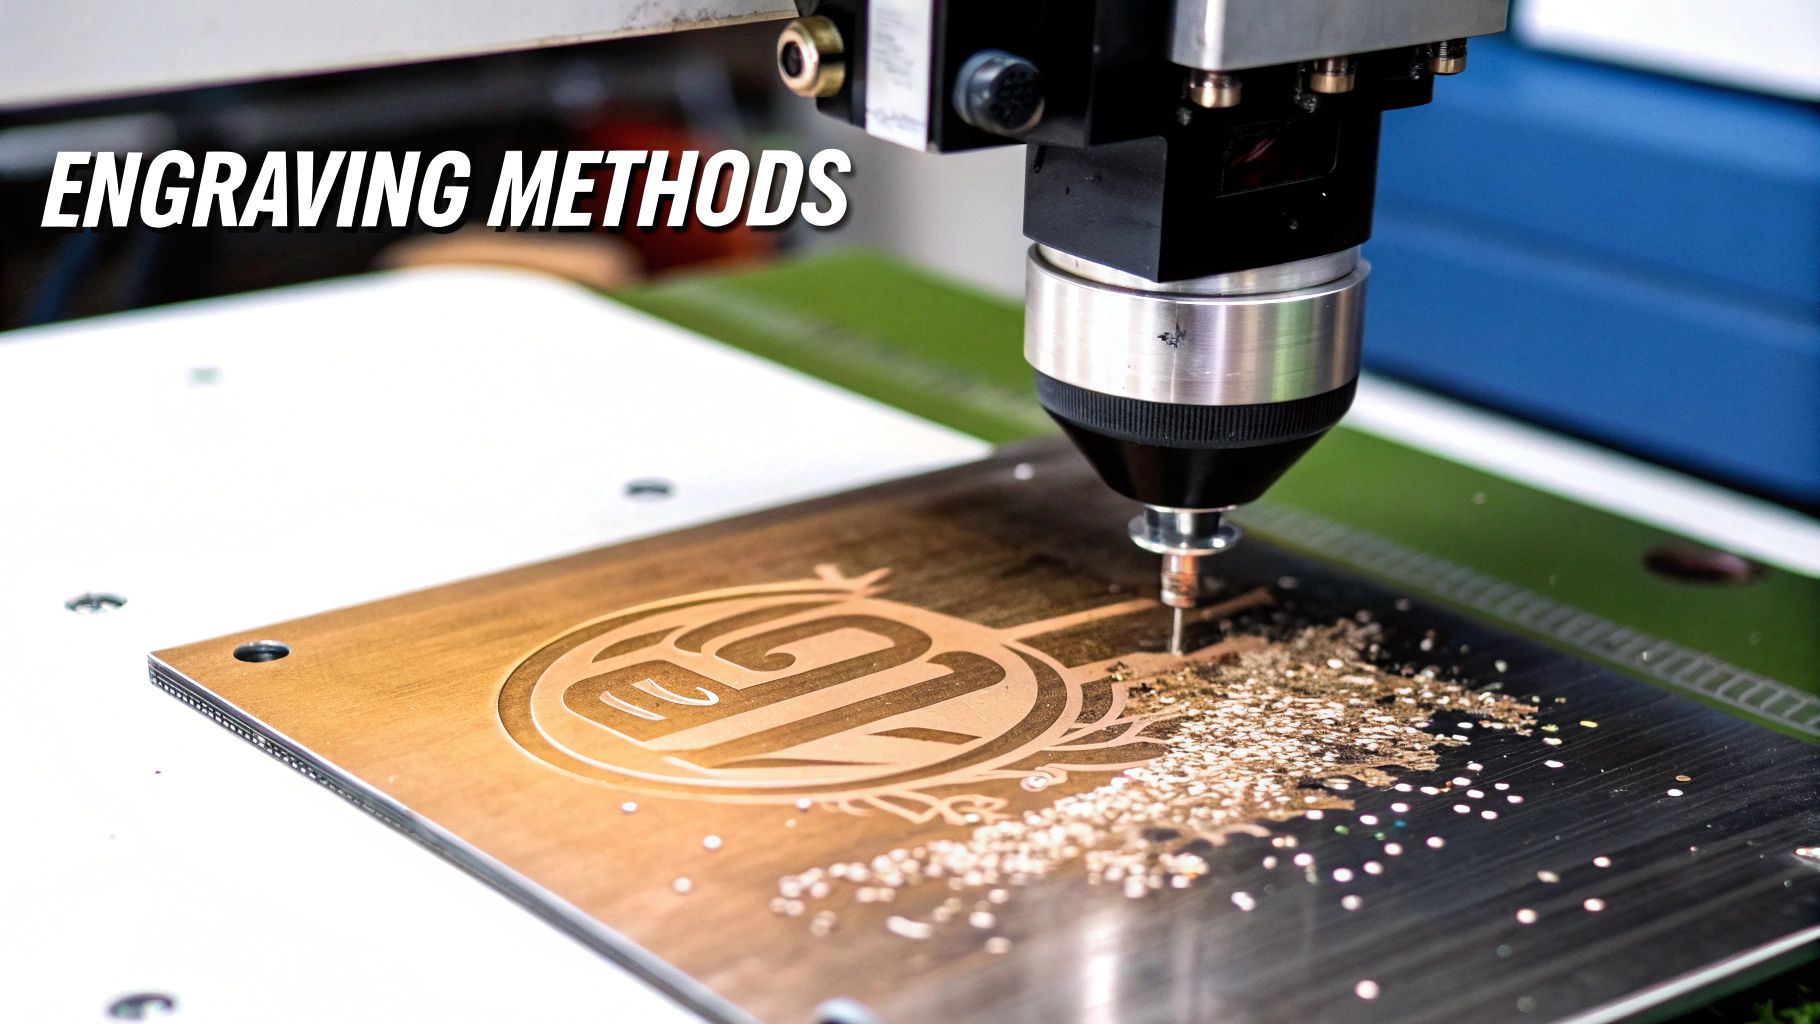
CNC and Rotary Engraving: The Digital Chisel
If a laser is a beam of light, think of CNC (Computer Numerical Control) or rotary engraving as a computer-guided chisel. This is a physical process where a spinning cutter bit carves directly into the metal, removing material to create deep, V-shaped or U-shaped grooves.
This technique creates lettering and graphics that you can actually feel, making it the go-to for signs requiring a tactile element. That depth provides exceptional durability and readability, even after years of wear and tear.
This physical carving process is the industry standard for producing ADA-compliant signage. The depth and dimension it creates are essential for tactile reading, ensuring accessibility and meeting federal requirements for permanent room identification.
The engraved grooves can also be filled with paint—a process called color-infilling—to add contrast or perfectly match your brand colors. To learn more about how it all comes together, you can explore the different techniques for making metal signs in our detailed guide.
Chemical Etching: Controlled Corrosion
Chemical etching, sometimes called photo-etching, is a more artistic and controlled process. It starts with a custom-designed mask (a "resist") that protects certain areas of the metal plate. The plate is then placed in a carefully controlled acid bath that dissolves the exposed parts, smoothly recessing the design into the surface without any tool marks.
The final result is an elegant, high-end look with smooth, recessed areas that can be filled with color for a beautiful finish. It’s a fantastic method for prestigious plaques and architectural signs where a refined appearance is paramount.
Actionable Insight
- When to Ask for It: You need an architectural-grade plaque for a building dedication, a commemorative award for a top employee, or any sign where a smooth, recessed design and a premium finish are essential. It is less common for industrial applications.
- Best On: Brass, bronze, and stainless steel, where the process creates a distinct look of quality and permanence.
Each method offers a unique path to a durable, professional sign. Understanding how they work empowers you to have a productive conversation with your sign fabricator, ensuring the final product matches your vision and serves its purpose perfectly.
Elevating Your Sign with Finishes and Mounting
Think of the engraving as the heart of your sign, but the finish and mounting are what give it a soul. These final touches are what turn a simple piece of etched metal into a polished, professional statement piece for your brand. They protect the sign, define its character, and make sure it gets the attention it deserves.
The right finish isn't an afterthought; it should complement the metal and the engraving method to create a cohesive, intentional look. This is the step where the sign’s final personality really comes to life.
Choosing the Perfect Metal Finish
A sign’s finish does more than just look good. It affects durability, maintenance, and even compliance with regulations like the ADA, which requires non-glare surfaces. It’s a choice that perfectly blends aesthetics with function.
- Brushed Finish: This is your go-to for a contemporary, textured look with fine, uniform lines. It's fantastic at hiding fingerprints and cutting down on glare, making it a favorite for stainless steel and aluminum signs in busy corporate lobbies.
- Polished Finish: Nothing says classic and high-end like a mirror shine. A polished finish is perfect for prestigious brass plaques or decorative accents where you want maximum visual pop.
- Powder Coating: When you need vibrant, durable color, powder coating is the answer. A dry powder is applied and then heat-cured, creating a tough, weather-resistant shell that’s ideal for exterior aluminum signs that need to match brand colors and stand up to the elements.
This choice is about longevity, too. The demand for architectural signs and custom metal plaques is growing, especially from industries that need signage built to last 10–20 years outdoors. That kind of durability comes from pairing the right metal—like aluminum or steel—with the proper protective coating.
Professional Mounting Methods
How you hang a sign is just as important as the sign itself. The mounting hardware contributes massively to the final look, creating anything from a seamless, built-in appearance to a dramatic, floating effect. Bad mounting can completely undermine even the most beautifully crafted sign.
Your mounting choice should complement the sign’s design and its environment. A heavy, exterior sign requires robust, secure hardware, while an interior lobby sign can use more decorative options to create a sophisticated focal point.
Let's break down a few of the most common and effective mounting solutions.
Common Mounting Solutions
- Standoffs: These are small metal barrels that hold the sign away from the wall, creating a stylish "floating" look. Standoffs add depth and a modern touch, making them perfect for lobby directories and reception area signs. You can learn more about how standoffs create a professional sign display in our related guide.
- Blind-Pin Mounting: For a completely clean look with zero visible hardware, this is the method. Threaded studs on the back of the sign slide into pre-drilled holes in the wall, where they’re secured with adhesive. It's the top choice for individual exterior building letters and high-end architectural signage.
- Direct Screw Mounting: This is the most straightforward method: drill holes through the sign's face and screw it directly to the wall. It’s practical and secure, but it's usually reserved for industrial settings or utility signs where function trumps aesthetics.
By thinking through both the finish and the mounting, you ensure your engraved metal sign isn't just well-made—it's displayed professionally for maximum impact.
Staying Compliant with ADA and Building Codes
For many businesses, a sign isn't just about branding or pointing the way—it's a legal requirement. Trying to navigate the rules of the Americans with Disabilities Act (ADA) and local building codes can feel like untangling a giant knot. But it really boils down to a few key principles that make sure your space is safe and accessible for everyone.
Getting this right is crucial when specifying engraved signs metal, ensuring they’re not just beautiful but fully compliant from day one.

This isn’t about checking boxes on a form. It's about creating an inclusive environment and, just as importantly, avoiding costly fines or frustrating project delays. The good news is that the core requirements are pretty straightforward once you know what to look for.
The Foundation of ADA Sign Compliance
First things first: not every sign in your building needs to meet ADA standards. The rules are primarily for signs identifying permanent rooms and spaces—think restrooms, stairwells, and specific room numbers. Your decorative lobby sign with the company logo? That's typically exempt.
For the signs that do need to be compliant, there are three main pillars to get right.
- Non-Glare Finish: The sign's surface has to be matte or non-glare to prevent reflections that make it hard to read. This is exactly why a highly polished, mirror-like finish won’t work for these signs. A brushed finish on aluminum or stainless steel, however, is a perfect compliant—and still very attractive—option.
- High Visual Contrast: The characters must pop against the background. It's a simple concept: light text on a dark background, or dark text on a light background. A black aluminum sign with silver-colored engraved letters is a classic, high-contrast combination that works every time.
- Tactile Elements: Letters have to be raised by 1/32 of an inch so they can be read by touch. Directly below the text, you must also include Grade 2 Braille. This is why rotary or CNC engraving is often the go-to fabrication method for compliant signs.
Practical Examples in Action
Let’s put these rules into a real-world context. Imagine a restroom sign in a new restaurant. It must have that non-glare finish, tactile lettering for "RESTROOM," and the matching Braille. It also has strict placement rules—it has to be mounted on the wall right next to the latch side of the door at a specific height.
Now, think about an engraved brass plaque in that same restaurant's entryway honoring a donor. That sign doesn't need any of these features. It can be polished to a brilliant shine because its purpose is decorative, not functional identification. As you're building out a new space, thinking about where ADA signs fit in is key, as highlighted in this useful opening a restaurant checklist.
It's a common mistake to assume all signs must follow the same rules. Understanding the difference between identifying signs (like "Room 204") and directional or informational signs (like a building directory) is key to a cost-effective and compliant signage plan.
Beyond the Basics: Local Codes and Expert Guidance
While the federal ADA rules provide a solid baseline, local building and fire codes can add another layer of requirements. These might specify the exact wording for exit signs, dictate material choices for certain environments, or require additional accessibility features.
This is where partnering with a knowledgeable sign provider becomes so valuable.
An experienced fabricator will already know the national standards and the little nuances of local ordinances, making sure your project is compliant right from the start. For a deeper look at the specifics, our detailed guide to ADA signage requirements breaks down the regulations clearly. By getting compliance right, you protect your business and create a welcoming space for every visitor.
Designing for Clarity and Longevity
An effective sign starts with smart design choices. The decisions you make before the metal is even touched directly impact readability, durability, and the final professional look of your engraved signs metal. It’s all about making sure your vision translates perfectly from the screen to the finished product.
Good design isn’t just about making things pretty; it’s about preparing your ideas for the physical reality of the engraving process. This means knowing what kind of artwork to provide and understanding how things like fonts and line thickness will actually behave when carved into a sheet of metal.
The Foundation of a Crisp Engraving Artwork Files
The single most important factor for a sharp, clean engraving is the type of artwork file you submit. Think of it like the difference between a photograph and a blueprint. A pixel-based file, like a .JPG or .PNG, is a photograph made of tiny dots. When you try to enlarge it, the edges get blurry and jagged, which leads to a fuzzy, low-quality engraving.
A vector file, on the other hand, is a blueprint. It uses mathematical paths to draw shapes, meaning it can be scaled to any size—from a tiny nameplate to a huge building sign—without ever losing its sharpness. The engraving machine follows these exact paths, creating perfectly crisp lines every single time.
Actionable Insight: Always provide your artwork in a vector format.
- Correct Files: .AI (Adobe Illustrator), .EPS, .SVG
- Incorrect Files: .JPG, .PNG, .GIF
Choosing Fonts and Lines That Last
Not everything that looks great on a computer screen will hold up on an engraved sign. The physical process of carving into metal has real-world limitations, and a smart design respects them.
Thin, delicate script fonts or hairline-thin lines in a logo can easily get lost or even break off during engraving, especially with deeper methods like CNC. They can also fill with dirt over time and become impossible to read. You’ll get much better results with bolder, clearer fonts and substantial line thicknesses. For great ideas, check out our complete guide to the best fonts for metal signs.
A good rule of thumb: If a design detail looks fragile on screen, it will likely be too fragile when engraved into metal. Opt for designs with a solid, confident structure for the best results.
Simple Maintenance for a Lifetime of Service
Your sign’s longevity also comes down to simple, proper care. Different metals and finishes need different cleaning methods to avoid damage. Grabbing the wrong cleaner can scratch the surface, strip a protective coating, or cause permanent discoloration.
- Brushed Aluminum and Stainless Steel: Stick with a soft, lint-free cloth, mild soap, and water. Always wipe in the direction of the grain to avoid creating swirls or scratches.
- Polished Brass: This material needs a bit more attention to prevent tarnishing. Unless it has a protective clear coat, use a cleaner made specifically for brass and a soft cloth to keep its brilliant shine.
By starting with the right artwork, making smart font choices, and following a few simple maintenance tips, you can ensure your engraved sign remains a clear and impressive representation of your brand for years to come.
Getting a Handle on Costs and Timelines
Let's be honest: budget and deadlines are where the rubber meets the road for any project. Ordering an engraved metal sign is no different. Getting a clear picture of what drives the price and how long it takes to make your sign helps you avoid surprises and make smart decisions from the start.
The final cost of your sign isn't just one number; it’s built from every choice you make along the way. From the metal you select to the smallest design detail, each decision shapes the final investment. The good news? That puts you in the driver's seat.
What Really Drives the Cost of a Metal Sign?
Think of these as the main ingredients that determine your final price tag. Nailing them down early on lets you balance that perfect look with your budget, so you get exactly what you want without any sticker shock.
- The Metal Itself: This is the big one. Brass and stainless steel have a premium feel and a price tag to match, while aluminum offers a fantastic look at a more accessible cost.
- Size and Thickness: It's simple—a bigger, thicker sign needs more raw material and often takes longer to work with, which nudges the price up.
- Engraving Detail: A few lines of clean text are straightforward. But a complex logo with intricate swoops and patterns? That requires more programming and machine time, adding to the cost.
- Special Finishes: A standard brushed or polished look is always a solid, cost-effective choice. If you need a custom powder-coated color to match your brand or an extra protective clear coat, that will add to the budget.
Making strategic trade-offs here can make a real difference. For instance, choosing a standard brushed aluminum finish over a custom color-matched powder coat can often trim both the cost and the production time, all without sacrificing a professional, high-quality appearance.
The Journey from Design to Delivery
Knowing how your sign gets made helps you plan your project timeline with confidence. While every job has its own quirks, the process for creating engraved metal signs usually follows a predictable path.
- Design and Proofing (1-3 Business Days): This is where we lock in your artwork. You'll get a digital proof to review and sign off on before anything goes into production.
- Material Prep (1-2 Business Days): Once you give the thumbs-up, we pull the raw metal sheet and cut it to the exact size and shape for your sign.
- Fabrication (3-7 Business Days): This is where the magic happens and it's typically the longest part of the process. Your sign gets engraved, any custom paint is carefully applied, and all the final finishes are added.
- Curing and Quality Check (1-2 Business Days): Fresh paint and protective coats need time to fully cure and harden. After that, your sign goes through a final, detailed inspection to make sure it's perfect.
- Shipping (Varies): How long this takes simply depends on where you are and the shipping method you choose.
Just a heads-up: this timeline officially kicks off after you've approved the final design proof. Any back-and-forth on artwork or delays in feedback will push back your final delivery date.
It's worth noting that in the wider signage industry, customization is king. Industry reports show that successful sign companies invest heavily in top-notch project management and design tools to handle custom jobs efficiently. High-value items like personalized metal plaques consistently bring in strong profit margins because they deliver a unique, premium product. You can read more about the 2025 state of the sign industry on signsofthetimes.com. By keeping these stages in mind, you can map out your project schedule like a pro.
Common Questions About Engraved Metal Signs
By now, you’ve got a good handle on the materials, methods, and details that go into a great engraved metal sign. To pull it all together, let's walk through some of the practical questions we hear most often from clients specifying signs for their facilities.
These are the real-world queries that come up right before making a final decision.
What Is the Most Durable Metal for Outdoor Signs?
For almost any exterior job, your best bets are stainless steel and properly coated aluminum. Stainless steel is the heavyweight champion here, offering incredible resistance to dings, scratches, and corrosion. It’s the go-to for high-traffic areas or places exposed to harsh weather.
Aluminum is your versatile, lightweight workhorse. It won’t rust on its own, and when you add an anodized or powder-coat finish, it holds up beautifully against sun and rain for years. While you can use brass outdoors, be prepared for some upkeep—it needs a protective clear coat and regular polishing to keep it from tarnishing.
How Do I Know If My Sign Is ADA Compliant?
Making sense of ADA rules can feel like untangling a knot, but the core idea is simple: make sure everyone can read and understand your signs. A compliant sign must have a non-glare finish, like brushed or matte, so it’s easy to read under bright lights. The text also needs to stand out with high contrast against the background.
For signs identifying permanent rooms, you'll also need tactile (raised) lettering and Grade 2 Braille. There are also strict rules for fonts (only sans-serif), character height, and even where the sign is installed. The best way to avoid a costly mistake is to work with a sign fabricator who lives and breathes these codes. They’ll make sure you meet every federal and local requirement.
What Artwork File Do I Need for Engraving?
For the sharpest, cleanest result, you absolutely need to provide your artwork in a vector format. The most common file types are .AI (Adobe Illustrator), .EPS, or .SVG.
Think of it this way: a normal image file like a .JPG is made of pixels. When you make it bigger, it gets blurry and jagged. A vector file, on the other hand, is built from mathematical paths. You can scale it to the size of a billboard, and the lines will stay perfectly crisp. That precision is exactly what an engraving machine needs to create flawless text and logos.
For a deeper dive into all things plaque-related, this a complete guide to metal recognition plaques is a fantastic resource for understanding the finer points of materials and finishes.
At On Display Signs, Inc., our team is ready to guide you through every step, from picking the right material to the final installation. We’ll make sure your engraved metal signs aren't just beautifully made, but are the perfect fit for your needs. Contact us today to start your project.
