Getting your ADA sign compliance right isn't just about checking a box on a legal form—it's about creating a genuinely accessible space for everyone. It means installing specific signs that allow people with disabilities to navigate your building safely and with confidence. Nail this, and you not only avoid legal headaches but also build a stronger connection with your entire community.
Why ADA Sign Compliance Is More Than a Legal Duty
For many business owners, the phrase "ADA compliance" immediately brings to mind a long list of regulations and the fear of fines. And while meeting those standards is non-negotiable, looking at it only as a legal hurdle means you’re missing the point. True compliance is about something much bigger: showing every person who visits your business that you respect them and value their presence.
The Americans with Disabilities Act (ADA), signed into law on July 26, 1990, was a landmark moment for civil rights. It was a promise of equal access and opportunity for the 61 million adults in the U.S. living with disabilities—that's about 26% of the adult population. The law was never just about rules; it was about dignity and inclusion.
Building an Inclusive Customer Experience
Think of your signage as the very first handshake you offer a customer. When your signs are clear and accessible, they send a silent but powerful message: "We thought about you, and you are welcome here." For someone with a visual impairment, a sign with tactile lettering and Braille isn't a small convenience; it's the key to navigating your space independently.
When signs are easy to find, mounted at the right height, and have the necessary features, you're actively removing barriers that can cause frustration and exclusion. This commitment to accessibility directly impacts your reputation and, ultimately, your bottom line.
A welcoming environment is a profitable one. Businesses that prioritize accessibility don't just attract customers with disabilities; they also win over their friends, family, and anyone else who appreciates inclusive values.
The Business Case for Proactive Compliance
Beyond doing the right thing, there are solid business reasons to get ahead of ADA sign compliance. Ignoring the standards can lead to steep financial penalties and legal trouble. But if you take a proactive approach, that legal requirement becomes a real business advantage.
- Mitigates Legal Risk: It’s far cheaper to install the right signs from the start than to face a lawsuit or pay to replace a building full of non-compliant signs down the road.
- Strengthens Your Brand: Showing you care about accessibility tells the community you're a business with strong values, and that builds incredible brand loyalty.
- Improves Overall Safety: Clear, consistent wayfinding signs don’t just help people with disabilities. They also benefit first responders, new visitors, and delivery drivers, making your entire environment safer and easier to navigate.
Getting compliance right often means looking at the full picture of regulations; for instance, understanding broader legal duties like OSHA compliance helps put the importance of these standards in perspective. Ultimately, proper signage for commercial buildings is a smart investment that serves every single person who walks through your doors.
Decoding the Technical Rules for Compliant Signs
Getting ADA sign compliance right boils down to the details. We've covered the "why"—now it’s time to dig into the "how." These technical specifications aren't just arbitrary rules; they exist to make sure signs are genuinely useful for everyone, especially people with visual impairments.
Think of these guidelines not as hurdles, but as a clear recipe for creating spaces that are truly accessible. From the feel of the letters to the glare on the surface, mastering these points is the key to getting it right.
The Foundation: Tactile Text and Braille
When you think of an ADA sign, the raised letters and Braille dots are probably the first things that come to mind. These tactile elements are what allow individuals who are blind or have low vision to read a sign by touch. But just gluing some letters on a board won't cut it—the rules are incredibly specific.
- Raised Characters: Every tactile letter and number must be raised precisely 1/32 of an inch from the sign's surface. They have to be uppercase and use a simple sans-serif font, which avoids the decorative hooks and tails that can be confusing to read by touch.
- Grade 2 Braille: This is a more compact form of Braille that uses contractions, much like shorthand, making it faster to read. It must be placed directly below the line of raised text it corresponds to. The dots themselves must be domed or rounded—flat-topped dots are much harder to distinguish.
Actionable Insight: When ordering signs, specifically ask your vendor to confirm they use Grade 2 Braille and that the tactile letter height is exactly 1/32 of an inch. A simple email confirmation can save you from a costly mistake.
The Science of Visibility: Contrast and Finish
A sign’s tactile features are only half the story. For the millions of Americans with low vision, a sign that blends into the wall is basically invisible. This is where the rules on color contrast and surface finish become non-negotiable.
Ever tried to read light grey text on a slightly lighter grey background? It’s a real struggle. The ADA prevents this exact problem by requiring a stark visual difference between the text and its background.
The rule of thumb is simple: light characters on a dark background, or dark characters on a light background. This isn't just a suggestion; it's measured with a formula called Light Reflectance Value (LRV), and the contrast level must hit at least 70%.
On top of that, the sign has to have a non-glare finish. Glossy or reflective surfaces are a nightmare under bright lights or when viewed from an angle, as they create light spots that completely wash out the text. A matte or eggshell finish diffuses light, keeping the message readable from any viewpoint. These rules are vital everywhere, but especially for signs covered in our guide to emergency exit signage requirements, where seconds count.
The diagram below shows how legal compliance isn't just about avoiding fines—it's also smart business and great customer service, all rolled into one.
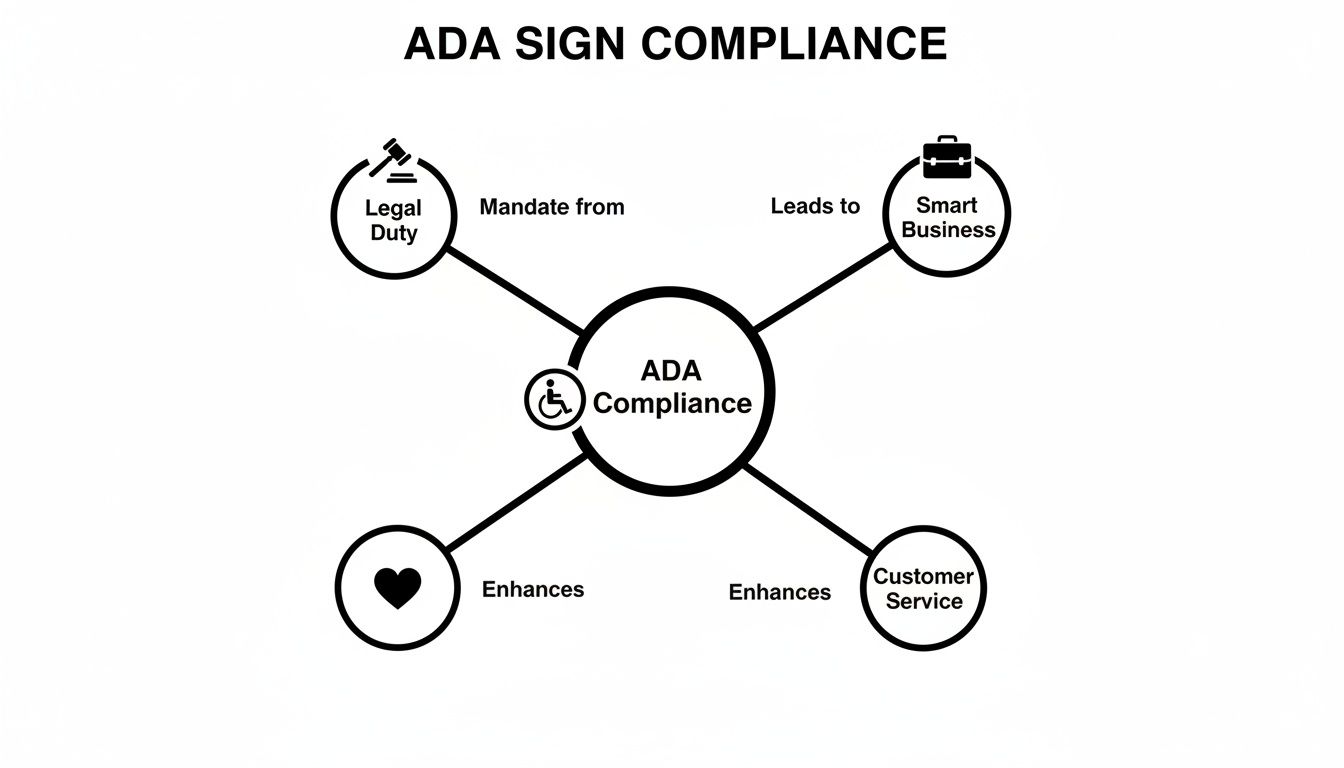
As you can see, these goals aren't competing priorities. They're all outcomes of a single, well-executed accessibility strategy.
Universal Communication Through Pictograms
Pictograms—or symbols—are the universal language of signage. The familiar wheelchair symbol, known as the International Symbol of Accessibility, is a perfect example. It communicates a clear message instantly, without relying on words. For these symbols to work, they have to be consistent and easy to spot.
To be compliant, pictograms must:
- Have Their Own Space: The symbol must be in a clear field at least 6 inches high, with no text or Braille crowding it.
- Pop Visually: Just like the text, the symbol must have a 70% contrast with its background.
- Use Approved Designs: You can't get creative here. Only specific, internationally recognized symbols for restrooms, accessibility, and stairs are allowed. Your cool, artistic take on the wheelchair symbol will make your sign non-compliant.
This standardization is what allows someone to quickly find a restroom or an accessible entrance, no matter what building they're in. Getting these technical details right is a theme across all regulated industries. For instance, the discipline required for adhering to technical compliance standards in other fields is a great parallel for the precision needed here.
ADA Signage Technical Specifications at a Glance
Navigating the nitty-gritty of ADA sign rules can feel overwhelming. This table breaks down the core technical requirements into a quick, easy-to-reference format.
| Requirement | Specification Detail | Common Application |
|---|---|---|
| Tactile Characters | Uppercase, sans-serif font, raised 1/32 inch | Room numbers, names (e.g., "OFFICE 101"), and permanent space identifiers. |
| Grade 2 Braille | Domed or rounded dots placed directly below tactile text. | Appears on all tactile signs to provide a readable format for Braille users. |
| Visual Contrast | Minimum 70% light reflectance value (LRV) difference between characters and background. | Dark text on a light background (or vice versa) ensures readability for low-vision individuals. |
| Sign Finish | Matte, eggshell, or other non-glare finish. | Prevents reflective hotspots from obscuring text under various lighting conditions. |
| Pictograms | Must reside in a 6-inch minimum clear field; must be a standardized symbol. | Used for restrooms, accessible entrances, stairs, and exits. |
| Mounting Height | 48 inches minimum from the floor to the baseline of the lowest tactile character, 60 inches maximum to the baseline of the highest. | Standard for wall-mounted signs next to doors, ensuring they are within reach and sightline. |
| Mounting Location | On the latch side of the door, with an 18 x 18-inch clear floor space. | Prevents signs from being hit by an opening door and ensures they are easy to approach. |
This table serves as a solid starting point. However, always remember that local codes can add another layer of requirements, so confirming with your jurisdiction is a crucial final step.
Mastering the Art of Sign Placement and Installation
Even the most perfectly designed ADA sign is useless if it’s installed in the wrong spot. Getting the placement right is the final, critical step that makes your signs truly functional. Think of it like a welcome mat—if you put it ten feet down the hall, it completely misses the point.
This is where attention to detail separates a mere wall decoration from a genuine navigation tool. Shockingly, incorrect installation is one of the most common—and easily avoidable—compliance failures we see. These rules aren't just arbitrary; they’re based on years of research into sightlines, reach ranges, and how people actually interact with a space.

The Critical Rules of Sign Height
One of the most specific rules in the ADA playbook is mounting height. Tactile signs have to be installed within a very precise vertical range. This consistency is key—it allows a person with a visual impairment to know exactly where to reach for a sign, no matter what building they're in.
The rules are refreshingly straightforward:
- The baseline of the lowest tactile characters must be at least 48 inches above the finished floor.
- The baseline of the highest tactile characters can be no more than 60 inches above the finished floor.
Actionable Insight: Use a tape measure and a level during installation. Mark the 48-inch and 60-inch lines on the wall with painter's tape to create a visual guide, ensuring every sign is placed within this required window.
Finding the Right Location for Your Sign
Height is only half the battle; location is just as important. You can't just slap a sign on the wall somewhere near the door and call it a day. The goal is to place it where someone can approach and read it without getting hit by an opening door or blocking traffic.
For single doors, the rule is to mount the sign on the wall along the latch side of the door. This keeps it safely out of the door's swing path. You also need a clear floor space of 18 by 18 inches in front of the sign, ensuring someone in a wheelchair can get close enough to read the Braille without any obstructions.
Imagine trying to read a sign while someone swings the door open right into you. The latch-side rule prevents that exact problem, creating a safe, predictable space for everyone.
But what about double doors? If both doors are active, the sign goes on the right-hand wall. If only one door is typically used, the sign should be placed on the wall next to the inactive door’s latch. This kind of logistical thinking is a core component of successful signage project management, especially for large-scale rollouts.
Why Professional Installation Matters
While a DIY approach might seem like a way to save a few bucks, the precision required for ADA compliance makes professional installation a smart investment. A sign that’s off by a single inch is technically non-compliant, opening your business up to potential fines and legal headaches.
An experienced installer understands the federal standards and the real-world nuances of different wall surfaces and building layouts. They ensure every sign is mounted securely and accurately the first time. This expertise removes the guesswork and gives you the peace of mind that your facility is truly welcoming and fully compliant.
Avoiding the Most Common ADA Signage Mistakes
Even the most well-intentioned businesses trip over ADA sign compliance, usually failing audits because of simple, preventable mistakes. Knowing what these common pitfalls are is the first step toward making your facility truly accessible—and protecting yourself from liability. Think of it as a proactive check-up to find and fix issues before they become expensive problems.
Getting compliance right is all about sweating the small stuff. A sign might look great to an everyday visitor, but if it misses key technical details, it completely fails its primary purpose. These tiny mistakes can make a sign useless to someone who depends on its tactile or high-contrast features.
Mistake 1: Poor Contrast and Glare
One of the most frequent violations we see is a sign that’s just plain hard to read. This isn't an artistic choice; it's a critical accessibility feature. For millions of people with low vision, the difference between the text and its background is what makes a sign readable in the first place.
- Practical Example: A business installs sleek, brushed aluminum signs with light gray text to match their modern decor. Aesthetically, it works. Functionally, the colors are too similar. Under bright lobby lights, the shiny surface creates a glare that makes the text nearly disappear from certain angles.
- Actionable Solution: The sign must have a minimum 70% contrast between the characters and the background. This usually means dark text on a light field or light text on a dark field. Swapping the glossy finish for a matte or eggshell one kills the glare, making sure the sign is legible in any lighting.
Mistake 2: Missing or Incorrect Braille
Any tactile sign identifying a permanent room—like a restroom, stairwell, or office—has to include Braille. Unfortunately, this is an area where mistakes run rampant, from using the wrong type of Braille to leaving it off entirely.
The ADA specifically requires Grade 2 Braille, which uses contractions to save space. Just as important, the dots themselves must be rounded or domed, not flat, so they can be easily read by touch.
A sign for a "CONFERENCE ROOM" without any Braille is completely non-compliant. Even if it has Braille, using flat-topped dots or incorrect spacing makes it unreadable and still fails the standard.
Here’s a quick breakdown of the essentials:
- Type: Always, always use Grade 2 Braille.
- Placement: It must be located directly below the corresponding line of raised text.
- Shape: The dots have to be domed. Flat or pointed dots don’t count.
This is why ensuring your sign fabricator is an expert in these precise specifications is absolutely critical.
Mistake 3: Incorrect Font and Character Spacing
Not just any font will fly on an ADA sign. The rules demand a simple, easy-to-read sans-serif font. That means no decorative tails or flourishes (serifs), because those little details can make the letters confusing to read by touch. The font choice is a bigger deal than you might think, and you can learn more about how typography impacts legibility by exploring the best fonts for metal signs and other common materials.
- Practical Example: A sign uses a stylish serif font like Times New Roman for its raised letters. While it looks nice, the extra flourishes on the letters make them difficult for a visually impaired person to decipher by touch.
- Actionable Solution: The sign gets remade using a compliant sans-serif font like Helvetica or Arial. On top of that, the spacing between each character is carefully calibrated to make sure every letter is a distinct, recognizable shape.
These errors might feel minor, but they add up to create real barriers. By focusing on these common slip-ups—contrast, Braille, and font—you can turn potential compliance headaches into simple fixes.
Your Practical On-Site ADA Compliance Checklist
All the technical rules in the world don't mean much until you see how they apply in your own space. It's one thing to read about compliance; it's another to actually put it into practice.
This section is all about turning theory into action. We’ve put together a straightforward checklist so you can walk through your facility and spot potential issues firsthand. Think of it as a simple way to translate complex legal standards into a manageable game plan.
ADA Signage Self-Audit Checklist
Before you start, grab a notepad and a tape measure. This quick walk-through will help you see your signs through the lens of accessibility, focusing on the most common—and most critical—compliance points.
| Audit Point | Requirement | Pass/Fail |
|---|---|---|
| Tactile Letters & Braille | Are letters raised 1/32" and is Grade 2 Braille present below the text on permanent room signs? | |
| Font & Case | Is the text in an all-uppercase, sans-serif font? | |
| Finish | Does the sign have a non-glare, matte, or eggshell finish to prevent reflections? | |
| Color Contrast | Is there a strong visual contrast (70% minimum) between the characters and the background? | |
| Mounting Location | Is the sign mounted on the latch side of the door, away from the door swing? | |
| Mounting Height | Is the baseline of the tactile text between 48 inches (min) and 60 inches (max) from the floor? | |
| Clear Floor Space | Is there a clear 18" x 18" floor area in front of the sign, free of obstructions? | |
| Directional Signs | For overhead or wayfinding signs, is the text large enough and does it have high visual contrast? |
This self-audit is your first, most powerful step toward ensuring your facility is welcoming to everyone. Don't worry if you find a few "fails"—that's exactly what this checklist is for. It gives you a clear starting point for making improvements.
Signs for Permanent Rooms and Spaces
Let’s start with the signs that get the most scrutiny: those identifying permanent spaces like offices, restrooms, conference rooms, and stairwells. These have the tightest rules for a reason.
-
Is the text all uppercase and in a sans-serif font? Fancy, decorative, or lowercase fonts are incredibly difficult to read by touch, which defeats the purpose of tactile lettering.
-
Are the characters tactile (raised)? The letters and numbers must be raised 1/32 of an inch. This tiny detail is what makes them physically readable.
-
Is Grade 2 Braille included right below the text? This isn't optional for permanent room signs. Braille is a non-negotiable part of the standard.
-
Does the sign have a non-glare or matte finish? A glossy sign might look sleek, but reflections and glare can make it completely unreadable for people with low vision.
-
Is the color contrast high enough? The 70% contrast rule is critical. Think black on white or white on navy—not light gray on off-white. This ensures the sign is legible for everyone.
Installation and Placement Check
Here’s a hard-earned piece of advice: a perfectly designed sign installed in the wrong spot is still a violation. Placement is just as important as the sign itself.
From our experience, improper installation is one of the most common failure points. A business will invest in a beautiful, compliant sign, only to mount it in a location that's obstructed or hazardous. Getting the placement right is half the battle.
-
Is the sign on the latch side of the door? This is a huge safety issue. Mounting a sign on the door or the hinge side means someone trying to read it could get hit by the door swinging open.
-
Is there an 18 x 18-inch clear space on the floor? This zone in front of the sign must be kept clear. It ensures someone in a wheelchair can get close enough to read the sign by touch without being blocked by a trash can, plant, or furniture.
-
Is the sign mounted at the right height? The baseline of the lowest tactile characters has a specific window: between 48 inches and 60 inches from the finished floor. This puts it within a reachable and viewable range for most people, whether standing or seated.
Directional and Overhead Signs
Finally, take a look at your wayfinding and overhead signs. While these signs don't need tactile elements or Braille, they absolutely must be easy to see and read from a distance.
-
Is the text big enough to read from far away? The required character height is directly related to how far away someone will be when they need to read it. Clarity is key.
-
Do they still have strong visual contrast? Just like tactile signs, your directional signs need that high contrast between the letters and the background to be effective for people with vision impairments.
If this checklist brought a few issues to light, you're already ahead of the game. The next step is understanding how to fix them, especially since local codes can add another layer of complexity. To get a handle on those local rules, check out our guide on sign permit requirements for a deeper dive into the process.
Going Beyond Federal Rules with State and Local Codes
It’s easy to think that meeting federal ADA standards is the finish line for compliance, but it’s really just the starting point. Think of the federal rules as the foundation for accessibility—a solid base, but not the whole house. Many states, counties, and cities have built on top of that foundation, adding their own specific requirements that often go much further.
This means a sign that’s perfectly legal in one state could get you flagged for a violation in the next. For businesses with multiple locations, this patchwork of rules can be a minefield of costly mistakes. Ignoring local codes is one of the fastest ways to fail an inspection.
How State and Local Codes Differ
So, what kind of differences are we talking about? The changes can be subtle but critical. A classic example is California, which has its own comprehensive accessibility standards known as Title 24.
- Practical Example: California requires specific geometric shapes on restroom signs—something you won't find in the federal code. Men's restrooms must have an equilateral triangle, while women's rooms need a circle. A standard rectangular restroom sign that is perfectly compliant in Arizona would be a violation in California.
- Mounting Nuances: Local fire codes might have their own say on where a sign can be placed, especially if it's near sprinklers or alarms. This adds another layer of complexity to the standard mounting height and location rules.
Forgetting to check local regulations is like building a house with a blueprint from another country. The foundation might be solid, but the local inspector will notice immediately that the electrical and plumbing codes don't match up.
Actionable Steps for Local Compliance
Trying to sort through this web of regulations can feel overwhelming, but a straightforward approach makes it manageable.
- Contact Your Local Building Department: This is your most direct route. Your city or county’s building and permitting office is the final authority on what’s required. They can give you the official documents or point you to the exact local statutes that apply to your project.
- Consult with a Compliance Expert: This is where working with an experienced sign partner really pays off. A professional who handles permits and installations in your area every day already knows the local nuances inside and out. They can review your plans and ensure every sign is good to go—meeting both federal and local standards from day one.
Taking these steps ensures your project gets done right the first time. Understanding the complete picture of ADA sign compliance, especially these critical state and local layers, saves you from expensive rework and ensures your business is truly welcoming to everyone in your community.
Common ADA Sign Compliance Questions Answered
Even after you get the hang of the rules, putting ADA compliance into practice in the real world always brings up a few tricky questions. Getting clear on these details is the key to moving forward with confidence and avoiding simple, costly mistakes.
Here are the answers to some of the most common questions we hear from business owners every day.
Do All Signs in My Building Need to Be ADA Compliant?
No, not every sign you have needs raised lettering and Braille. The strict rules apply to signs that identify permanent rooms and spaces—think restrooms, conference rooms, electrical closets, and stairwells. These are the ones that absolutely must have tactile characters and Braille.
Marketing signs, temporary event notices, or large building directories fall under a different set of rules. The key is knowing which signs serve a permanent function so you can focus your efforts where they're needed most.
Can I Make My Own ADA Compliant Signs?
We strongly advise against it. ADA signage is a game of millimeters. It demands absolute precision in everything from font height and character spacing to the placement of Braille dots and color contrast.
A sign that is off by a fraction of an inch in character height or Braille dot placement is considered non-compliant. The risk of getting it wrong and facing liability far outweighs any potential savings.
Without specialized fabrication equipment and a deep understanding of the standards, it's incredibly easy to get it wrong. Working with a professional sign partner is the only reliable way to guarantee accuracy.
What Is the Difference Between a Directional and an Identification Sign?
This is a critical distinction. An identification sign puts a name on a specific, permanent room—like "Room 101" or "Mechanical." These signs must have tactile letters and Braille.
A directional sign, on the other hand, just points the way. Think of signs with arrows pointing toward the "Lobby" or "Restrooms." These signs don't need tactile elements, but they still have to follow strict rules for high contrast, clean fonts, and proper character heights to be readable from a distance.
My Business Is in an Old Building. Do I Still Need to Comply?
Yes. The ADA applies to all businesses open to the public, no matter how old the building is. While the law might make allowances for massive structural changes, updating your signage is considered a "readily achievable" fix—basically, it's a must-do.
And if you're planning any renovations, you'll be required to bring your signs up to current ADA code as part of the project. It's always better to be proactive and get it done right.
Navigating the complexities of ADA sign compliance doesn't have to be a solo effort. The team at On Display Signs, Inc. manages every detail, from design and fabrication to permitting and installation, ensuring your business is fully compliant and welcoming to everyone. Learn how our end-to-end signage solutions can help your business.

