Think of trade show display printing as the difference between showing up with a folding table and a business card, versus building a pop-up storefront that people can't wait to step inside. It's the process of transforming a generic, empty plot of convention floor into an immersive brand experience. This isn't just about printing a logo; it's about using smart design and the right materials to stop people in their tracks on a crowded floor.
From Empty Space to Unforgettable Booth
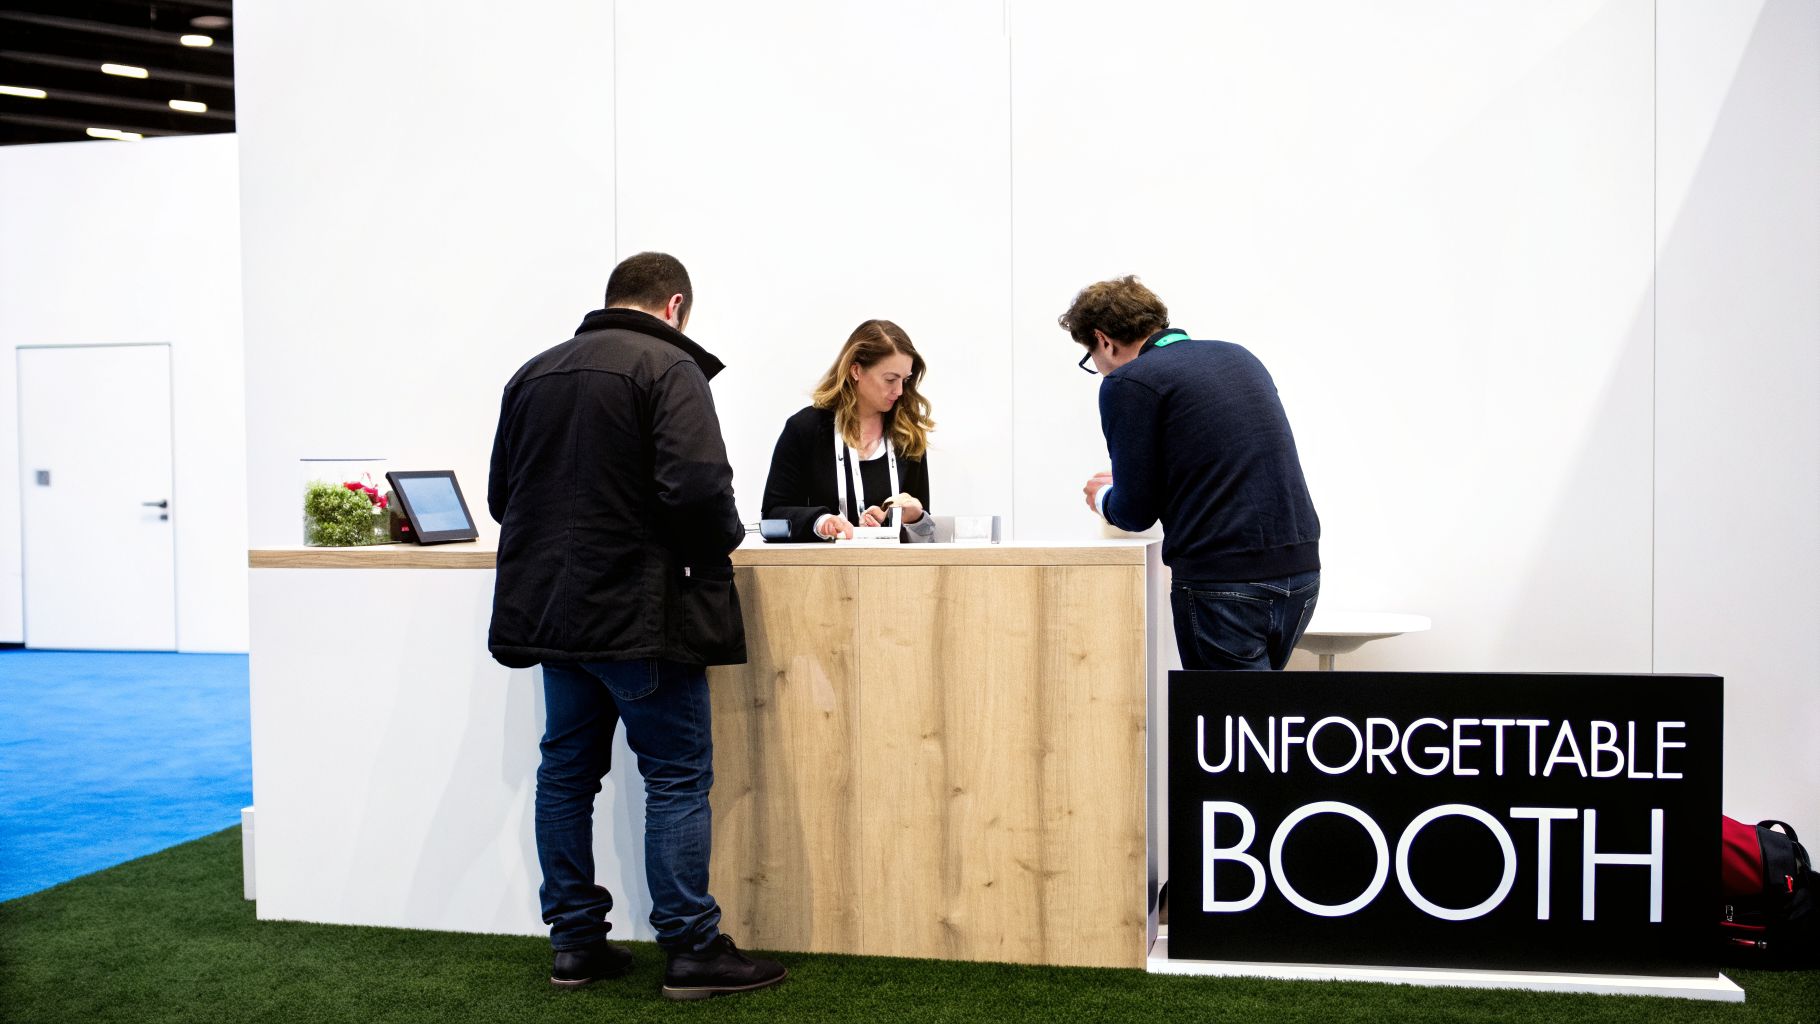
The trade show floor is a battlefield for attention. With hundreds of companies all vying for the same eyeballs, how do you make your booth the one people remember? It all comes down to your display. This goes way beyond just putting your logo on a banner; it’s about creating a physical environment that tells your story and pulls people into your world.
Understanding the unique energy of a trade show, or a specialized event like an expo, is the first step. Your graphics are often the very first handshake a potential client has with your business. They need to be powerful enough to be seen from across the hall, yet interesting enough to hold someone's attention up close.
Turning a Booth into a Destination
A fantastic display turns your rented space from just another booth number into a must-see destination on the event map. This guide is your playbook for turning the overwhelming process of trade show printing into a straightforward, actionable plan.
We'll walk you through every crucial decision point, including:
- Choosing the Right Display: We’ll break down how different display types, from pop-ups to modular backwalls, match up with specific event goals and budgets.
- Understanding Print Technology: You'll learn the difference between dye-sublimation for fabric and UV printing for rigid boards—and why picking the right one is critical for your final look.
- Preparing Flawless Design Files: We’ll show you how to prep your artwork like a pro to avoid expensive mistakes, focusing on things like resolution, color, and bleed.
Actionable Insight: Think of your display as your most effective silent salesperson. It works tirelessly to attract leads, reinforce your brand message, and create a memorable experience for everyone who walks by.
This guide gives you the practical knowledge to make sure your investment pays off. By mastering the fundamentals, you can turn a standard 10×10 space into a powerful lead-generation machine. We'll also cover keeping your graphics looking sharp—for more on that, see our guide on how to hang banners to prevent damage and ensure they always look professional.
Choosing the Right Display for Your Goals
Your trade show display is your silent salesperson. It’s the handshake, the first impression, and the conversation starter all rolled into one, working tirelessly to pull people into your booth. Picking the right one isn't just about what looks good; it's about matching the hardware to your goals, budget, and the reality of who will be setting it up.
This isn't a one-size-fits-all decision. Let's walk through the most common display types, so you can figure out which one is the smartest investment for your team and your brand.
Pop-Up Displays for Portability and Speed
Think of the pop-up display as the trusted workhorse of the event circuit. Its genius lies in its collapsible, accordion-style frame that literally "pops up" into a full-sized backwall in just a few minutes. Your printed graphic—whether it's fabric or a series of panels—attaches right to it.
Practical Example: A software company sending a single salesperson to five regional trade shows in one quarter should choose a pop-up display. It can be checked as luggage on a flight, set up by one person in under 10 minutes, and provides a professional backdrop without the need for a dedicated setup crew.
Retractable Banners for Versatility
Retractable banners, or roll-up banners, are the Swiss Army knives of event marketing. The concept is simple: a printed graphic retracts into a spring-loaded base. Pull it up, and you have an instant sign. When you're done, it rolls back into its base for easy transport and storage.
Their real strength is their versatility. A startup on a shoestring budget might use two or three of these to create their entire booth for a first show. A larger company, on the other hand, can use them to complement a massive display, placing them at the entrance to spotlight a new product or a show-only special. They’re a low-cost, small-footprint way to add messaging wherever you need it.
Actionable Insight: The power of a display isn't its size—it's how well it supports your goals. A simple, well-placed banner with a clear offer will always beat a giant, confusing backwall. Strategy and clarity are everything.
Of course, the right structure is just the start. If you’re taking your event outdoors, you have to think about stability and weather. Our guide on selecting a tent for trade shows gives you practical tips for making sure your outdoor setup is both secure and impressive.
Tension Fabric Displays for a Polished Look
For brands that want to project a sleek, high-end image, tension fabric displays are the go-to choice. These systems start with a lightweight aluminum tube frame that snaps together without any tools. Then, a single, large fabric graphic—printed with vibrant dye-sublimation—stretches over it like a pillowcase and zips tight.
That "tension" is the secret sauce. It pulls the fabric perfectly taut, smoothing out every wrinkle for a flawless, professional finish. The look is modern, clean, and immediately signals quality, making it ideal for companies that need their branding to feel premium.
Custom Modular Backdrops for Adaptability
Think of custom modular backdrops like a set of high-end Legos for your trade show booth. They're built from a "kit of parts"—a collection of interchangeable frames, panels, and accessories that you can reconfigure in countless ways. You can build in shelving, add monitor mounts, create arches, or even integrate backlighting.
Practical Example: A national manufacturing company might invest in a modular system. For the year's biggest industry event, they use all the parts to create a sprawling 10×20 booth with integrated product shelves and a video monitor. For smaller regional shows, they use just the backwall and counter sections for a compact 10×10 footprint. This maximizes their investment across their entire event calendar.
The Technology Behind Stunning Booth Graphics
Ever wonder what separates a bland, forgettable display from one that commands attention and looks incredible even up close? It’s not just the design—it's the printing technology working behind the scenes. Getting this right is the difference between a display that looks sharp and professional versus one that just looks… cheap.
Understanding a bit about how your graphics are made is the key to a smart investment. The printing method directly impacts everything from color vibrancy to durability, so let's pull back the curtain on the two main technologies you'll encounter.
Dye-Sublimation for Vibrant Fabric Graphics
For any display that uses fabric—think tension fabric systems or pop-up backdrops—dye-sublimation is the undisputed champion. Think of it less like printing ink on the fabric and more like tattooing the color into the fibers themselves.
The process uses intense heat to turn solid ink into a gas, which then permanently infuses the fabric. The ink becomes part of the material, which means the graphic won't crack, peel, or wash out. The result is a stunningly vibrant, photorealistic image that looks premium and is built to last.
Here's why it's the gold standard for fabric:
- Vibrancy: It produces deep, rich colors that truly pop, grabbing attention from clear across the convention hall.
- Durability: Because the ink is fused with the fabric, the graphic is fully washable—a massive advantage for a display you plan to use more than once.
- Wrinkle-Resistance: The process is perfect for the polyester-based fabrics used in displays, which are naturally wrinkle-resistant and create a smooth, taut finish when stretched on a frame.
UV Printing for Durable Rigid Graphics
When you’re dealing with rigid materials—like PVC for a welcome counter, acrylic for a backlit logo, or foam board for smaller signs—the go-to technology is UV printing. Imagine a printer laying down ink directly onto the material's surface, followed immediately by high-intensity ultraviolet (UV) lights that flash-cure it on the spot.
This instant-drying process creates an incredibly tough, scratch-resistant finish. It’s perfect for surfaces that will be touched, leaned on, or have to survive the bumps and scrapes of a busy trade show. UV printing delivers crisp, high-resolution graphics on a huge range of materials. You can see more real-world examples in our guide to large format printing.
Actionable Insight: The choice here is strategic. Dye-sublimation gives you that flawless, high-end look for your big fabric backwalls, while UV printing provides the rugged durability you need for the functional, high-touch parts of your booth.
This chart can help you quickly match your needs for portability, impact, and budget to the right type of display.
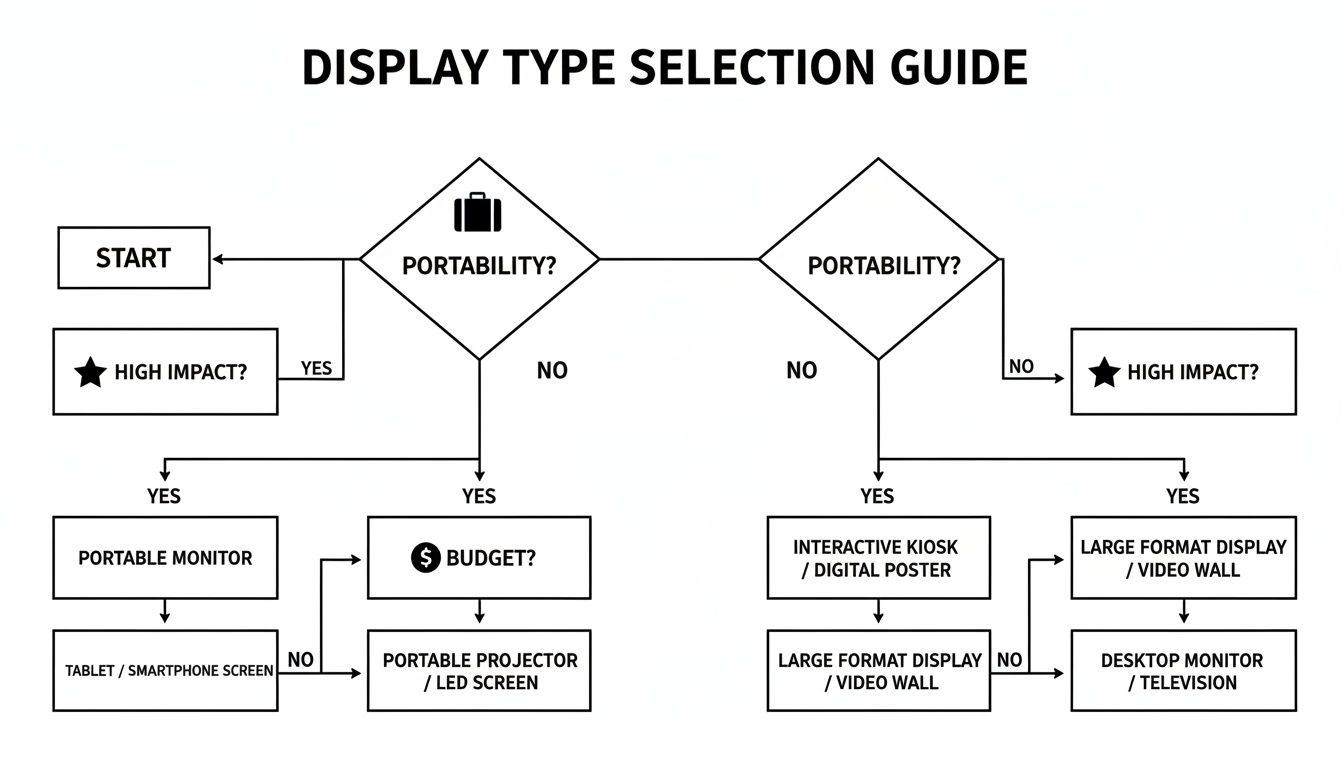
As you can see, there’s a perfect solution whether you’re a road warrior who needs something ultra-portable or an exhibitor at a major show who needs to make a massive splash.
Matching Materials to Your Goals
Beyond the printing method, the material itself is just as important. It’s not about picking from a list; it’s about choosing the right tool for the job.
| Material Type | Primary Use Case | Key Advantage |
|---|---|---|
| Tension Fabric | Large backdrops, pop-up displays | Creates a seamless, lightweight, and wrinkle-free look. Easy to ship and assemble. |
| Stretch Fabric | Custom shapes, hanging signs | Its elasticity lets it conform to unique frame shapes for a distinctive appearance. |
| PVC Board | Counters, rigid signage, booth walls | Offers excellent durability and a smooth surface for tough, scratch-resistant graphics. |
| Backlit Fabric | Lightbox displays | Specially made to diffuse light evenly, making colors appear exceptionally bright and vibrant. |
Practical Example: A medical device company wants to showcase a new diagnostic machine. They choose a backlit fabric display wall to make their high-tech product imagery glow. For their reception desk, they use a PVC board with UV-printed graphics, knowing it can withstand leaning attendees and spilled coffee without damage. This strategic combination ensures both visual impact and long-term durability.
Designing for Impact and Avoiding Print Errors
This is where your vision meets the real world—the critical moment a great idea becomes a physical display. But a brilliant design can completely fall apart if it isn't set up correctly for large-format printing. Simple technical mistakes can lead to blurry graphics, off-brand colors, and key information getting chopped off, forcing you into expensive and stressful last-minute reprints.
Think of it like this: sending a low-resolution image for your backdrop is like trying to blow up a tiny photo from your phone into a giant billboard. It just turns into a pixelated, unprofessional mess. Let's walk through the essentials of prepping your design files to make sure they look just as good on the trade show floor as they do on your screen.
File Format: The Foundation of Quality
Your first decision is the file format, and it’s a big one. For trade show graphics, you’re mainly dealing with two kinds of files: vector and raster.
Vector Files (.AI, .EPS, .PDF): These are your absolute best friends for logos, text, and any clean graphics. Vectors use math to create shapes, which means you can scale them to any size—from a business card to a massive backdrop—with zero loss in quality. They stay perfectly sharp.
Raster Files (.JPG, .PNG, .TIFF): These are for photographs and are built from pixels. While they’re great for complex images, they have a set resolution. If you stretch a raster image too far beyond its original size, it will get blurry and pixelated.
Practical Example: When designing a 10-foot backwall, ensure your company logo, tagline, and contact information are all vector elements. The beautiful product photograph in the background can be a high-resolution raster image, but the critical text and branding must be vector to remain crisp when viewed up close.
Getting Resolution Right for Large Displays
Resolution, measured in Dots Per Inch (DPI), dictates how sharp a printed image will be. For something you hold in your hand, like a flyer, the standard is 300 DPI. But for a huge trade show backdrop that people see from several feet away, the rules change.
Because of that viewing distance, you can get away with a lower DPI. For a large back wall, a common standard is 100-150 DPI at the final print size. Submitting a 72 DPI graphic you pulled from a website will be a blurry disaster. Always ask your print provider for their required DPI, as it can change based on the material.
Actionable Insight: A quick pre-flight check will save you from a major headache. Before sending any files, have your designer confirm three things: resolution is correct for the final size, all colors are in CMYK, and all fonts have been converted to outlines.
This simple review catches the most common print errors right away.
Color Mode and Safe Zones
Another classic mistake is color. Your computer screen uses an RGB (Red, Green, Blue) color model, which is based on light. Printers, however, run on a CMYK (Cyan, Magenta, Yellow, Black) model, which is based on ink. If you send a file in RGB, the printer’s software will automatically convert it, and you'll often get some ugly, unexpected color shifts. Always design in CMYK from the very beginning.
Finally, any good printer will give you a design template for your display. Use it. These templates show three critical areas:
- Bleed Area: The outer margin that gets trimmed off. You need to extend your background to this line to avoid ugly white edges after cutting.
- Trim Line: This is the line where the final display will actually be cut.
- Safe Zone: This is the most important part. All your critical logos, text, and contact info must stay inside this zone to guarantee they won’t be trimmed off or covered by the display's hardware.
Ignoring these guides is just asking for trouble. Using the provided template is the single best thing you can do to ensure your finished display looks exactly how you imagined it. For displays built around repeating logos, our guide on designing step and repeat signs has more specific tips for getting that alignment perfect.
Protecting Your Investment for the Long Haul
A beautiful trade show display is a serious marketing investment, but its real value comes from its lifespan. The practical side—durability, cleaning, and transport—is what ensures your booth looks just as sharp on its tenth show as it did on its first.
Thinking about longevity actually starts before you even approve the design. The finishing options you select during the printing process are your first line of defense against the bumps, scuffs, and spills of the trade show circuit.
Add a Layer of Armor with Laminates
For rigid graphics printed on materials like PVC or foam board, think of a laminate finish as a coat of armor. This clear protective layer, available in matte or gloss, makes the surface far more resistant to scratches and incredibly easy to clean.
Practical Example: For a reception counter that will be used at a dozen shows a year, always add a matte laminate. It will prevent unsightly fingerprints and allow you to easily wipe off coffee spills or pen marks, keeping the counter looking professional for years.
Keeping Your Graphics Looking New
The secret to a long display life is proper care, but you can’t treat every material the same way. Trying to clean a fabric graphic like a rigid panel is a recipe for disaster.
- Fabric Graphics: Most dye-sublimated polyester fabrics can be machine washed on a gentle, cold cycle. The most important rule? Always air dry them. A machine dryer’s heat can shrink or ruin the graphic. Small spots can usually be handled with a bit of mild detergent and water.
- Rigid Panels: For UV-printed graphics on PVC, acrylic, or foam-core, stick with a soft microfiber cloth and a gentle cleaner. Mild soap and water are perfect. Stay away from abrasive chemicals or scrubby sponges that will scratch the print right off. If you want to know more about this material, check out our guide that answers the question, "What is foam core board?".
Actionable Insight: Your display case isn't just a box; it's insurance for your brand's image. Investing in a quality case is one of the smartest decisions you can make to protect the money and effort you put into your trade show presence.
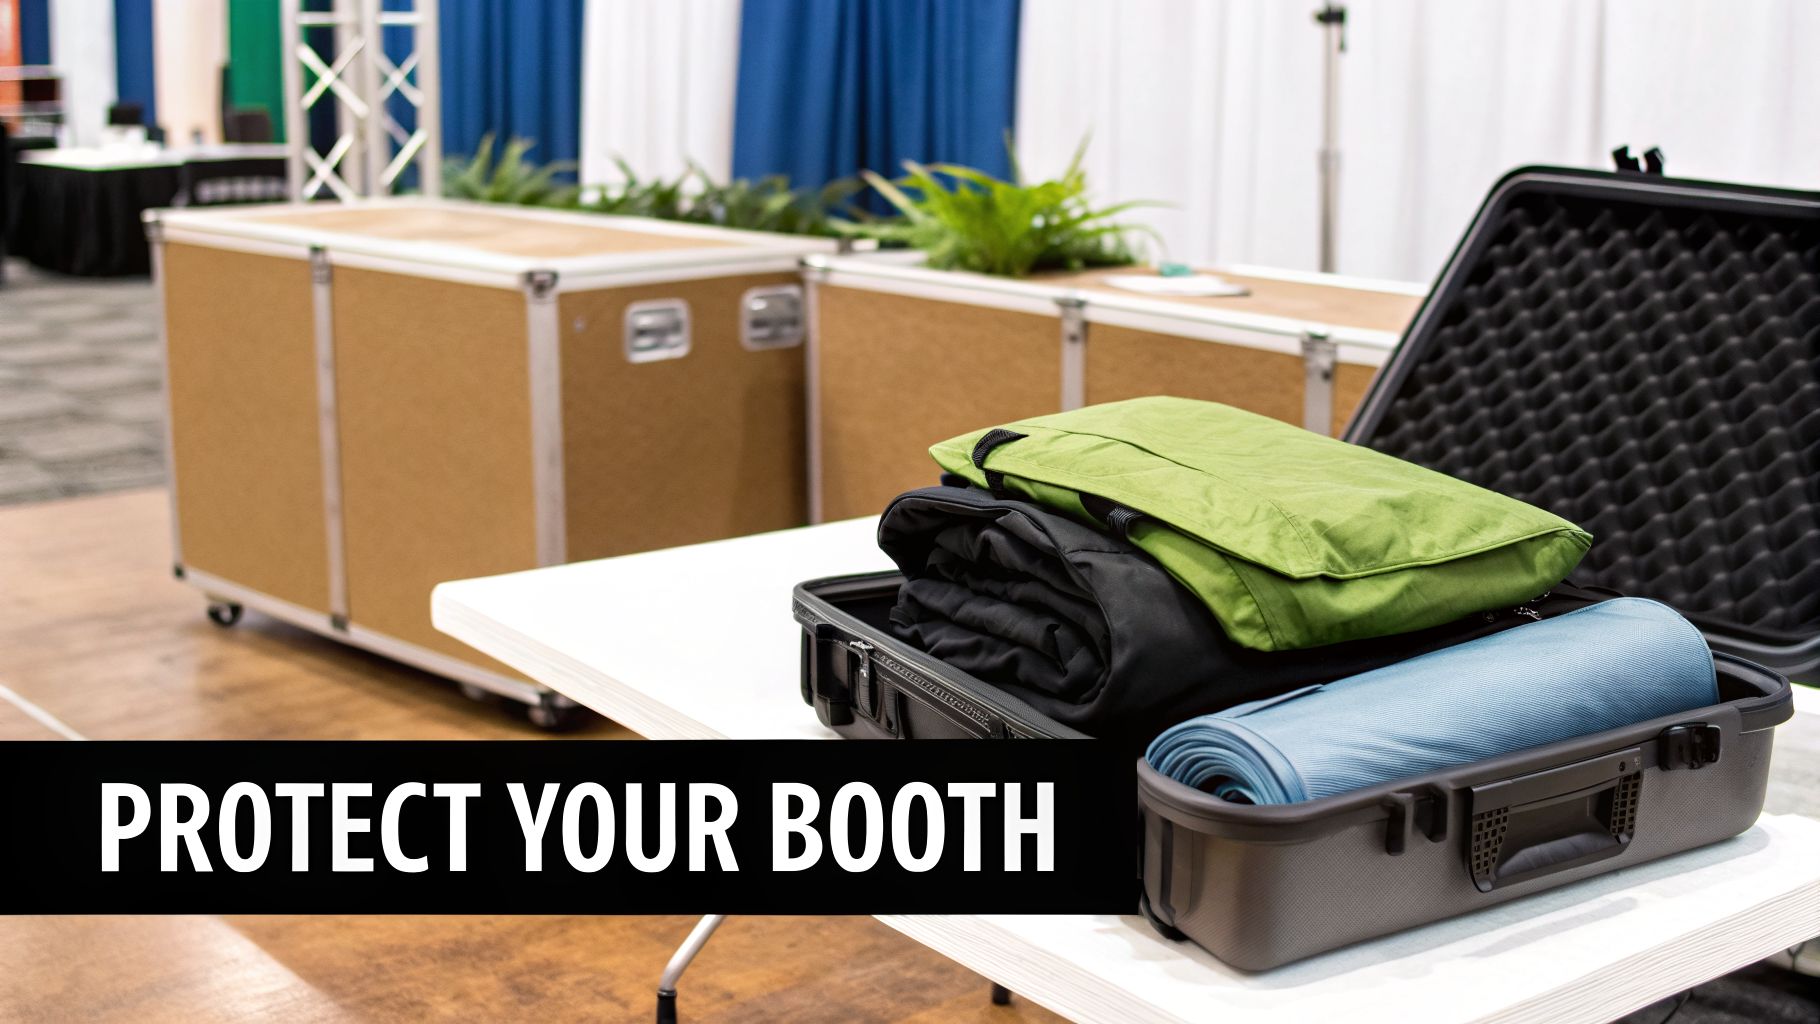
The easiest way to destroy a display is to ship it improperly. Choosing the right case to protect it between events is absolutely critical.
Choosing the Right Travel Case
Hard travel cases, usually made from tough molded plastic, offer the best protection possible. They’re built to withstand the impacts, drops, and crushing forces of freight shipping and airline baggage handling. They cost more and are heavier, but that rugged build buys you peace of mind.
On the other hand, soft, padded cases are lighter and easier on the budget. They’re a great choice if your team is driving the display to a local or regional show. Just remember, they offer very little protection from major impacts and should never be used for freight shipping.
Understanding Project Timelines and Costs
Think of planning your trade show display like planning a road trip. Just knowing the final destination isn't enough—you need to map out the route, account for stops, and give yourself a buffer for unexpected traffic. Nailing down your timeline and budget isn't just about getting a quote; it's about making sure your display arrives ready for showtime, without any last-minute panic.
The biggest factors driving your cost are pretty simple: the size and type of display, the materials you choose, and any custom touches like special shapes or protective laminates. It’s common sense, really—a massive 10×20 backlit fabric wall will have a different price tag than a handful of retractable banners. A custom-built counter will naturally cost more than a standard pop-up frame.
Breaking Down Your Project Timeline
One of the most common slip-ups we see is confusing production time with your total project timeline. They are not the same thing. To stay ahead, you need to see the project in three clear stages:
- Design and Proofing: This is where your vision comes to life. It covers everything from the initial design concept to the back-and-forth of reviewing and approving proofs. Depending on how complex your artwork is and how many changes are needed, this can take a few days or even a couple of weeks.
- Production: Once you give the final "go-ahead" on the proof, your display officially hits the production floor. For most standard displays, you can expect this to take 5-7 business days.
- Shipping: This is the final journey to your doorstep or event venue. Depending on how far you are from the printer, ground shipping can add another 1-5 business days to your timeline. Always plan for potential shipping delays—they happen!
Actionable Insight: As a rule of thumb, it’s a safe bet to start a standard display project 4-6 weeks before your show. If you're planning something more complex or fully custom, give yourself 8-10 weeks. This buffer is the best way to guarantee a smooth, stress-free process.
Smart Budgeting for Your Display
Smart budgeting isn't about pinching every penny—it's about investing in a display that pays you back over the long run. The easiest way to control your costs? Order early. Rush fees can seriously inflate your final bill, and simply planning ahead eliminates them completely.
Another great strategy is to think in terms of modular graphics. Instead of one giant, unchangeable backdrop, consider a system with swappable fabric panels. This lets you refresh your messaging for different events or product launches without having to buy a whole new hardware setup, saving you a ton of money over time.
This forward-thinking approach is more important than ever. With the B2B trade show market valued at $16.5 billion in 2025 and projected to climb to $17.3 billion by 2028, the competition on the show floor is only getting fiercer. A smart investment in your display is a direct investment in your ability to stand out. You can dig into what's driving this growth by checking out the latest trade show statistics.
Common Questions About Trade Show Display Printing
Once you've got the basic concepts down, the real-world questions start popping up. We get it. Juggling deadlines, budgets, and design approvals is where the rubber meets the road.
Let's walk through the most common questions we hear from clients, clearing up those final logistical hurdles so you can head to your next event with total confidence.
How Far in Advance Should I Order My Display?
The biggest source of stress in trade show prep is almost always a last-minute order. To avoid the chaos and expensive rush fees, give yourself a healthy cushion.
Our best advice is to kick off the process 4-6 weeks before your event. This leaves plenty of time for design work, proofing, production, and ground shipping without any nail-biting. If you're planning a more complex or fully custom booth, you'll want to start even sooner—think 8-10 weeks out. This gives everyone breathing room to get every single detail just right.
Can I Reuse My Display for Different Shows?
You absolutely should. Getting multiple shows out of your hardware is the single best way to maximize your return on investment. The trick is to invest in a flexible system from the start, like a modular or pop-up display.
Practical Example: A marketing agency uses the same modular display hardware for a tech conference and a healthcare expo. For the tech show, they use a fabric panel featuring software icons. For the healthcare show, they swap it for a panel with medical imagery. The hardware investment is made once, but the messaging is tailored for each audience at minimal cost.
Actionable Insight: The most common—and costly—design mistake is visual clutter. Exhibitors try to cram their entire sales pitch onto a backdrop, making it impossible to read from a few feet away. Your display should be a billboard, not a brochure.
A great display uses a single, bold headline, powerful imagery, and lots of open space to pull people in. Your goal is to start a conversation, not hand out a textbook. Save the details for the one-on-one chat.
What Is the Most Durable Display Option?
Durability really depends on the tag team of hardware and graphics. For backdrops, nothing beats the resilience of tension fabric displays. The dye-sublimated graphics are tough against scuffs and can even be machine washed, while the aluminum frames are built for repeated setup and teardown.
But for high-traffic pieces like a reception counter that will take some bumps, UV-printed graphics on a hard material like PVC board is the clear champion. This combo is incredibly resistant to scratches and dings, making sure it looks sharp show after show.
Ready to create a display that stops traffic and tells your brand's story? The team at On Display Signs, Inc. is here to guide you through every step, from design to delivery.
Explore our trade show display solutions and get a quote today!
