Graduation season puts a very specific kind of project on someone’s desk. The date is fixed. The message needs to feel celebratory. The campus, church, shopping center, or event site has to look organized and intentional. And the banner that seemed simple at first suddenly turns into a chain of decisions about wind, visibility, mounting, artwork, approval, and local rules.
That’s where many first large-scale banner projects go sideways. A team orders the right message on the wrong material. Or they choose a size that looks fine on a proof and disappears once it’s hung across a drive lane. Or they wait until artwork is approved before asking whether the banner can even go on that wall or fence.
Outdoor graduation banners work best when they’re treated like a facilities project, not a party accessory. The strongest results usually come from a clear scope, realistic production timing, and installation details that are decided before the printer starts. If graduate portraits are part of the display package, it also helps to line up assets early, especially if your team needs to generate studio photos instantly for consistent, polished visuals across multiple banners.
If this is your first major rollout, start with a partner that understands local conditions, installation logistics, and code questions, not just print files. A nearby local sign company can save you from the common mistake of treating banners as a last-minute purchase instead of a managed signage project.
Your Graduation Banner Project Starts Here
A school administrator might begin with a simple request. “We need banners for the gym entrance, the front fence, and the graduation stage.” A retail property manager might have a similar version. “We’re hosting a recognition event for scholarship winners and need the site dressed before guests arrive.” Both projects sound straightforward until the practical questions start.
Where will each banner hang? Is that wall exposed to wind? Will the banner be viewed from a parking lot, a sidewalk, or a roadway? Does the landlord, city, campus, or church board need to approve placement first? These questions determine whether the final result looks professional or temporary in the worst way.
The biggest mindset shift is this. A banner is not just artwork on a rectangle. It’s a printed sign that has to perform in a real environment. That means the job includes message hierarchy, substrate selection, finishing, hardware, and site conditions.
What experienced teams decide first
Before artwork is finalized, strong project managers lock down the operating facts:
- Installation surface: Brick wall, fence, pole, railing, stage truss, and temporary frame all require different finishing and hardware.
- Exposure level: A sheltered courtyard and a windy corner lot are different jobs, even if the banners are the same size.
- Viewing conditions: Drivers need a short, bold message. Guests walking into a ceremony can absorb more detail.
- Approval path: Facilities, marketing, administration, and property management often all need to sign off.
Practical rule: If the banner location isn’t confirmed, the order isn’t ready.
What usually causes avoidable problems
The trouble spots are predictable. Teams overdesign. They pick low-contrast artwork because it looks elegant on screen. They assume all vinyl is the same. They postpone installation planning until the truck arrives.
The professional approach is calmer and much less dramatic. Treat each banner as a job with a purpose. One banner may need to welcome guests. Another may need to identify a ceremony area. Another may need to celebrate graduates by name. Once each banner has a role, the rest of the decisions become easier.
Choosing Your Banner Material for Durability and Finish
Material choice decides whether a graduation banner still looks professional on event day or starts curling, tearing, and fading before guests arrive. On larger campus or multi-site projects, this decision affects more than appearance. It affects reprint risk, installation labor, and whether one spec can realistically work across very different exposure conditions.
For many temporary outdoor banner programs, 13 oz. vinyl is the practical baseline. It gives good print quality, controlled cost, and enough body for common installations on walls, fences, and entry points. According to Centex Printing’s graduation banner material guidance, reinforced 13 oz. banner stock can handle winds up to 25 to 30 mph in appropriate applications. That makes it a solid fit for short seasonal use where the site has some protection and the banner is not spanning a highly exposed opening.
Where 13 oz. vinyl makes sense
This is the material I see specified most often for commencement signage, and usually for good reason. It prints cleanly, ships efficiently, and keeps a multi-banner order from getting expensive too early in the quoting process.
Use it for jobs like these:
- Short-duration graduation campaigns: Ceremony entrances, campus wayfinding, graduate recognition banners, and seasonal perimeter displays.
- Moderate exposure areas: Building facades, courtyard fencing, and other placements that are outdoors but not taking constant wind pressure.
- Large orders with budget control: District-wide or property-wide programs where overspecifying every banner would drive up cost without improving results.
If your team is comparing banner stock with other exterior substrates, this guide to the best materials for outdoor signs is a useful reference before final approvals.
Where 18 oz. vinyl earns the extra cost
Heavier vinyl belongs on harder jobs. It has more tear resistance, more stiffness, and better long-term wear, which matters if the banner is oversized, reused, or installed in an exposed area. The same source notes that 18 oz. vinyl reduces failure rates by 40% in high-wind areas compared with lighter options.
That upgrade is not automatic. For a small entrance banner up for two weeks, 18 oz. can be unnecessary. For a broad fence run, a banner on a windy parking deck, or a reusable event kit that will be installed and stored several times, the heavier material often saves money by avoiding emergency replacement and extra labor.
The trade-off is simple. Higher material cost upfront versus lower failure risk later.
Where mesh vinyl solves the real problem
Some sites should not get solid vinyl at all. Open athletic fields, roadside fences, parking lot perimeters, and pole-mounted applications put too much wind load on a standard face. Mesh vinyl addresses that specific problem by letting air pass through the printed surface. Centex Printing reports that mesh can reduce sail-like lift forces by up to 50% compared to solid vinyl.
Mesh is not the best visual finish for every situation. At close range, the print will not look as dense or smooth as solid vinyl. For distance viewing in windy conditions, that is usually an acceptable compromise. A banner that stays secure and readable is the better outcome.
Outdoor Banner Material Comparison
| Material | Best For | Wind Resistance | Expected Lifespan (Outdoor) | Relative Cost |
|---|---|---|---|---|
| 13 oz. vinyl | Temporary graduation displays in moderate conditions | Withstands 25 to 30 mph winds, per the source above | Temporary outdoor use | Lower |
| 18 oz. vinyl | Longer-term use and more exposed installations | Higher tear strength. 40% lower failure rate in high-wind areas, per the same source | Longer-term outdoor use | Higher |
| Mesh vinyl | High-wind locations and pole or fence applications | Up to 50% less sail-like lift force than solid vinyl, per the same source | Strong choice for exposed outdoor use | Mid to higher |
How experienced teams spec mixed-material orders
The cleanest approach for a larger graduation rollout is to divide the project by exposure zone instead of forcing one material across every location. Entrance banners may use 13 oz. vinyl. Fence lines in open wind corridors may need mesh. Oversized feature banners or repeat-use pieces may justify 18 oz.
That approach keeps the package on budget without treating every banner like it faces the same conditions. Consumer template tools rarely account for that kind of planning. On real school, campus, and commercial properties, it is usually the difference between a banner program that installs once and performs, and one that turns into a maintenance problem halfway through the season.
Banner Sizing and Design for Maximum Impact
A banner can be built perfectly and still fail if nobody can read it. That usually happens because teams design from a laptop screen instead of from the audience’s position. Drivers, arriving families, and guests crossing a quad don’t study a banner. They glance at it. Outdoor graduation banners need to communicate at a glance first, then reward a closer look.

Match size to the site, not the template
The most common sizing mistake is ordering by habit. A standard banner size may be fine for one location and undersized for another. The right size depends on three things: viewing distance, speed of the audience, and how much visual competition surrounds the banner.
Use this field-tested planning method:
- Close pedestrian use: Keep the message simple, but you can include a subline, crest, or event detail.
- Parking lot approach: Prioritize the event name and year. Secondary details should stay limited.
- Roadside or drive lane visibility: Use the shortest possible message with strong contrast and large type.
For projects that need oversized fascia banners, fence runs, or stage backdrops, coordinate with a provider that handles large format printing services so the artwork and finishing are built for the actual span, not forced into an off-the-shelf dimension.
A simple readability check
If the banner’s main line can’t be understood in a quick glance, the design is trying to do too much. That’s especially common when schools want to include a crest, full event title, sponsor names, website, social handle, and several photos on one face.
A better approach is to build the design in layers:
- Primary line: “Congratulations Class of 2026” or “Graduation Ceremony”
- Secondary line: School name, church name, or event location
- Support graphic: Crest, mascot, seal, or one hero image
That’s enough for most exterior applications.
Keep the banner’s message shorter than the internal approval conversation it took to create it.
Design choices that read well outdoors
Outdoor graphics need stronger discipline than indoor posters. Fine detail gets lost. Pale tones flatten. Busy backgrounds make text disappear.
What consistently works:
- High contrast: Dark text on a light field, or light text on a dark field.
- Bold typefaces: Clean sans-serif fonts usually hold up best from distance.
- One visual focal point: A school crest, graduate portrait, or strong year mark.
- Breathing room: Empty space improves legibility. It doesn’t waste space.
What usually fails:
- Too much copy: Guests won’t stop to read paragraphs on an exterior banner.
- Low-resolution images: Soft photos become obvious on large prints.
- Thin script fonts: Attractive on proofs, unreadable in the field.
- Crowded sponsor blocks: Better moved to a separate recognition banner if needed.
Multi-site consistency matters
Large projects often involve more than one banner. Entrance banners, stage banners, fence banners, and directional recognition graphics all need to look related without being identical. The cleanest systems use one color palette, one font family, and one hierarchy across the package.
That consistency helps in two ways. First, the site feels planned rather than pieced together. Second, future reorders become easier because the design system is already established.
Secure Installation and Mounting Methods
Installation is where banner performance becomes real. A good print can still wrinkle, sag, tear, or fail if the finishing and hardware don’t match the surface. The strongest installation plans start by asking one question: what exactly is carrying the load?
A chain-link fence behaves differently than a brick wall. Light poles behave differently than stage frames. Outdoor graduation banners need a mounting method that supports the banner evenly and limits stress at the edges and corners. If your team needs a more detailed installation reference before ordering hardware, review how to hang banners with the actual site photos in hand.
Grommets for fences and simple perimeter installs
Grommets are the standard finishing choice for many temporary installs. They work especially well on fences, rails, and framed openings where the banner can be tied off at multiple points.
This method works best when:
- The banner has frequent tie points: Even attachment reduces flapping.
- The surface is forgiving: Fences and rails let installers distribute tension.
- The display is temporary: Fast setup and removal matter.
What causes problems is tying only the corners and expecting the center span to behave. That leaves the face loose and puts too much force on too few points. Use enough attachment points to keep the banner taut without overstretching it.
Pole pockets for structured displays
Pole pockets are ideal when the banner slides over a rod, crossbar, or light-pole arm. This finishing style creates a cleaner look and often controls the shape of the banner better than edge grommets alone.
They’re a strong fit for ceremonial entrances, campus walkways, and repeat-use event hardware. The key is making sure the pocket size matches the support hardware before fabrication begins. A banner with the wrong pocket spec is a delay waiting to happen.
If the installation hardware hasn’t been measured, the finishing details are still guesses.
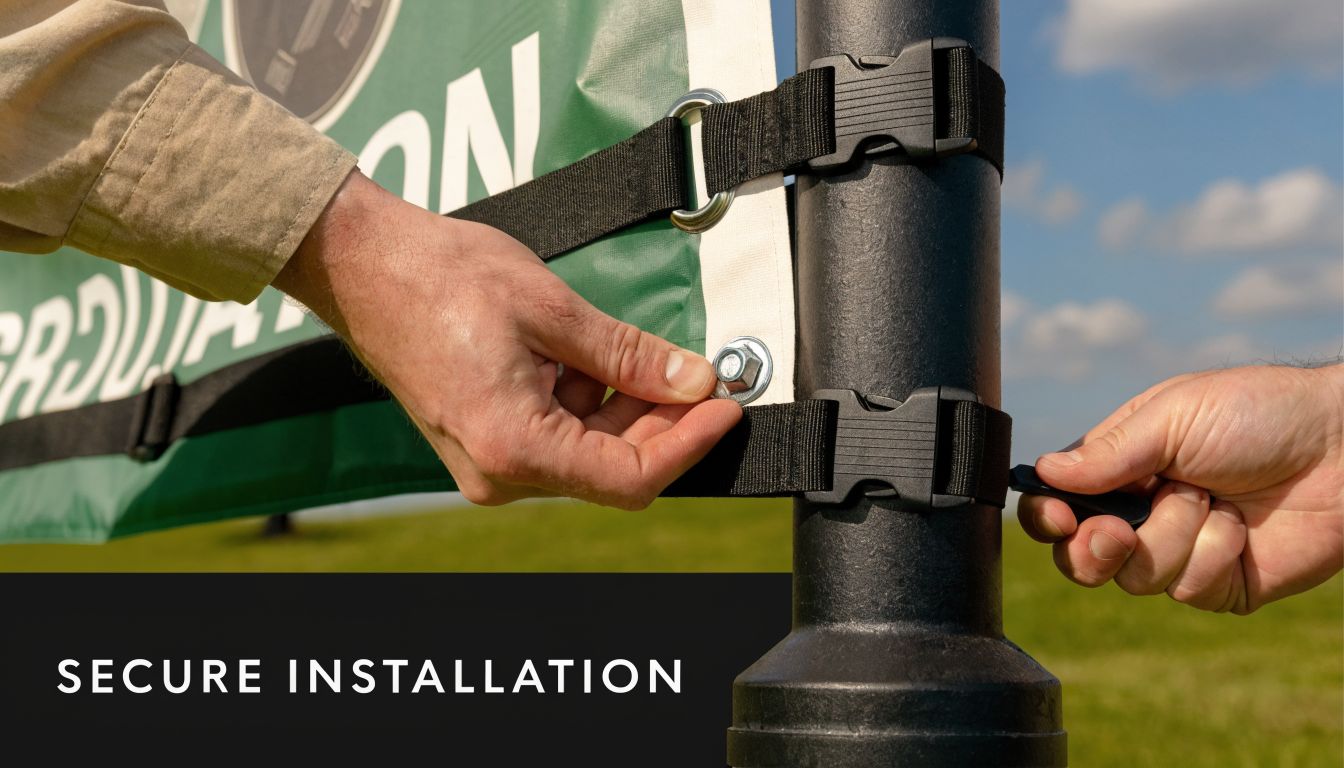
Webbing and D-rings for tougher pulls
Some wall spans and high-tension applications need more support than standard edge finishing. Reinforced webbing with D-rings helps distribute load more reliably on demanding installs, especially where a banner will be stretched across a rigid frame or secured to fixed structural points.
This isn’t the default for every project. It’s the right call when the banner is large, the span is exposed, or the installation crew needs a more controlled tensioning method.
A short visual walkthrough can help teams understand how banner mounting choices affect field performance:
Installation practices that hold up better
The cleanest installs usually follow a few disciplined habits:
- Pre-stage hardware: Don’t discover missing straps or anchors at the lift.
- Tension evenly: Pulling one side too hard creates wrinkles and stress points.
- Protect corners: Corners often fail first when the banner moves.
- Inspect the surface: Rust, burrs, and rough edges can damage the banner quickly.
- Plan removal at the same time: Temporary signage should come down cleanly.
One more practical note. When wind is a known issue, choosing a wind-appropriate material is better than trying to fix the problem at installation. Hardware helps, but it can’t fully compensate for a banner face that’s wrong for the site.
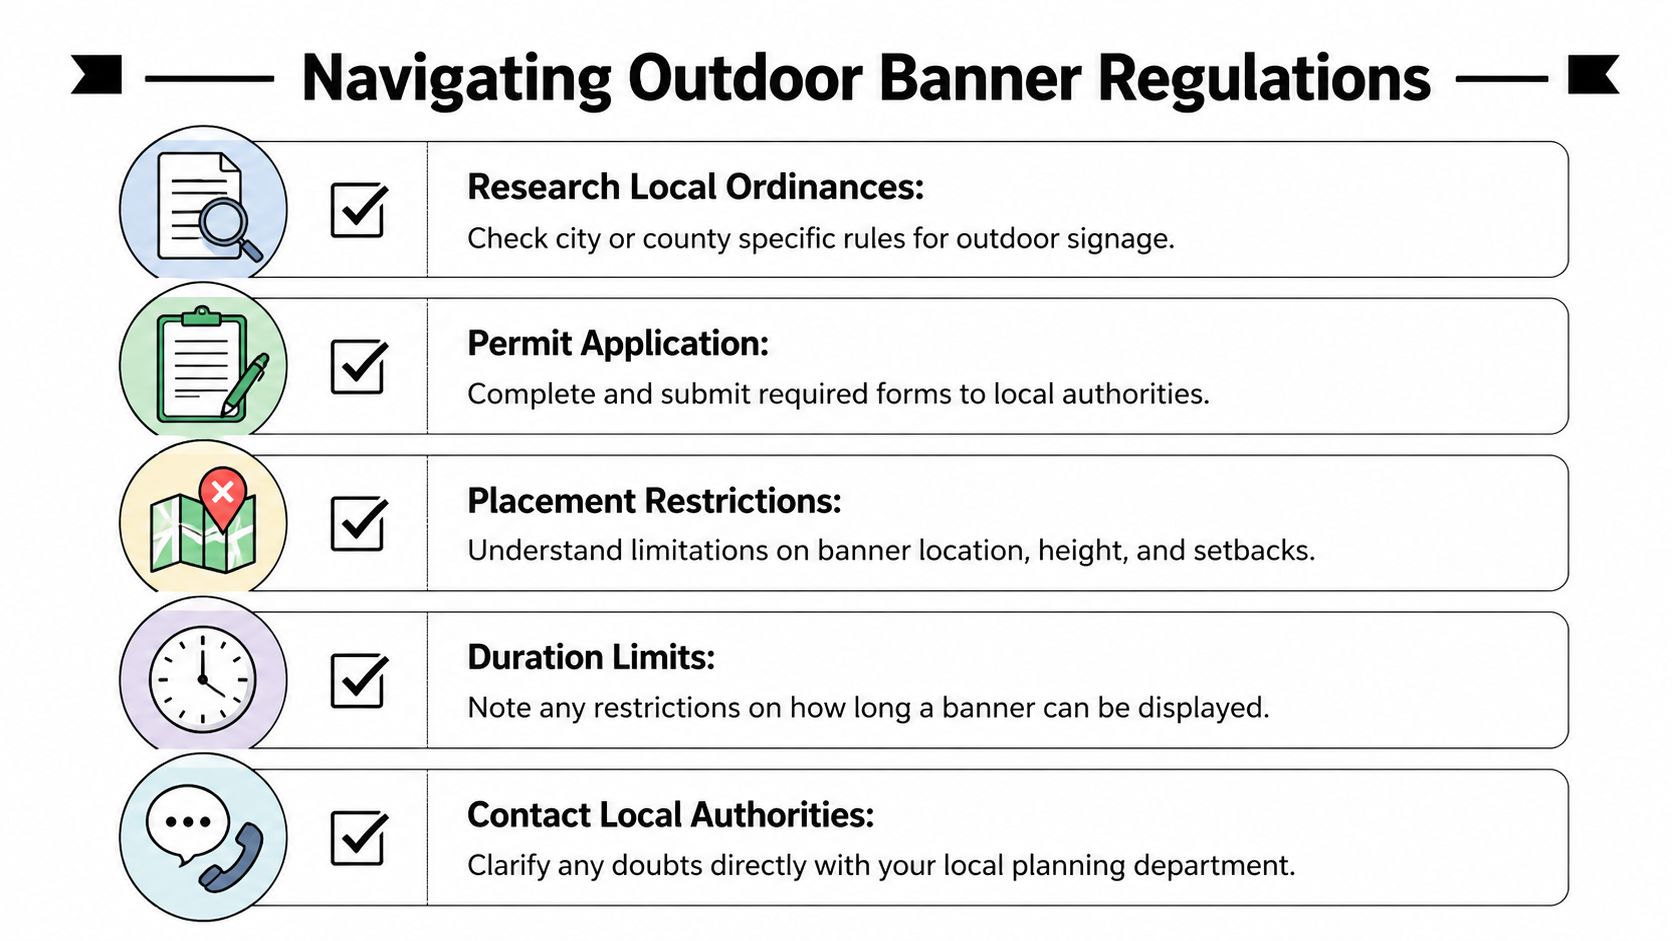
Navigating Permits and Placement Rules
A school approves the artwork, production is on schedule, and the install crew is booked. Then facilities learns the banner location sits too close to the street, the landlord wants written approval, or the city classifies the display as a temporary sign with a firm removal date. That is how a simple graduation banner order turns into a delay, a reprint, or an avoidable compliance problem.
Placement review needs to happen before final approval, not after the banner is in production. On larger school, campus, and multi-property projects, this step matters as much as artwork.
Why permit and placement issues cause so many banner delays
Temporary banners feel low-risk because they are short-term. City code, campus standards, landlord rules, and development sign criteria often treat them as formal signage anyway. The print itself may be fine, but the project can still fail if the display period is too long, the location crosses into a public right-of-way, or the approving party is not the actual property controller.
Consumer banner templates do not account for that. They help with layout. They do not tell a school district whether a fence belongs to the district, the municipality, or a shared-use athletic complex. They do not flag monument sign areas that are governed by a master sign program. For schools, churches, commercial developers, and organizations ordering at scale, those details decide whether the banner goes up on time.
Questions to settle before the order is released
Start with the site file and the property record. Then confirm the basic constraints.
- Who has authority over the site: School district, landlord, church board, HOA, developer, municipality, or another controlling party
- Whether the banner sits on private property or near public right-of-way: That line often changes the approval path
- How long the display will stay up: Short event windows can still trigger temporary sign rules
- What structure will carry the banner: Fence panels, building walls, parking lot enclosures, and freestanding frames may be regulated differently
- Whether the property has its own sign standards: Many campuses and mixed-use developments enforce rules beyond municipal code
For a practical starting point, review these sign permit requirements before the schedule is locked and artwork approvals begin.
Compliance needs an owner
This step gets missed when nobody is clearly responsible for it. Marketing may approve the message. Administration may approve the event. Facilities may assume the vendor checked code. The vendor may assume the property owner already cleared placement.
That gap causes trouble.
On well-run projects, one person owns the approval path and documents it. For a school, that is often facilities or operations. For a commercial property, it may be the property manager or development team. The goal is simple. Confirm the location, the display window, the approving authority, and any permit requirement before the order is released to print.
A field-tested approval workflow
Use a short process and keep records in one place:
- Confirm property control with the person or entity authorized to approve temporary signage.
- Check local code and site rules for display duration, placement limits, height, setbacks, and restricted zones.
- Verify the exact install location on a site photo, map, or marked elevation so everyone is reviewing the same spot.
- Determine whether a permit or written property approval is required and assign responsibility for submission.
- Set the removal date in advance so the banner does not stay up past the approved window.
A banner is not project-complete when it arrives from the printer. It is complete when it is approved, installed in the correct location, and removed on schedule without complaints, fines, or last-minute scrambling.
Planning Your Banner Project Timeline and Budget
The strongest outdoor graduation banners usually come from ordinary discipline, not heroics. Teams that hit the date and stay on budget tend to make decisions in the right sequence. Teams that rush often spend more, approve less carefully, and create installation headaches that could have been avoided a week earlier.
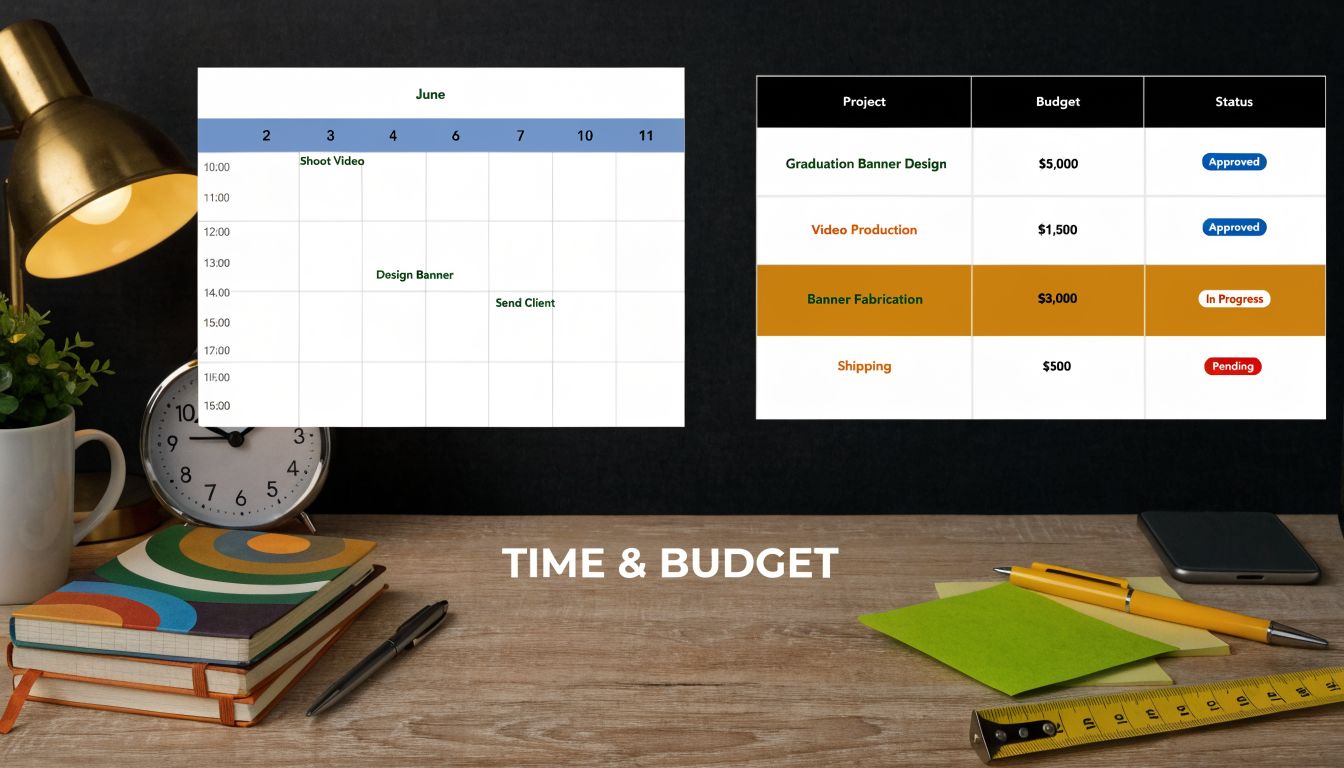
Build the schedule backward from installation day
Start with the date the banner must be fully installed, not the day you hope to order it. Then work backward through approvals, artwork preparation, production, shipping, and site readiness.
A practical sequence usually looks like this:
- Site confirmation first: Lock placement and installation method before design goes too far.
- Artwork prep next: Gather logos, photos, copy, and brand standards early.
- Internal approvals after that: Marketing, administration, and facilities should review the same proof set.
- Permit review where needed: Never assume this step can be slipped in later.
- Production and delivery: Leave room for revisions, freight timing, and receiving coordination.
- Installation before the last possible day: Give yourself a buffer before the event.
The biggest schedule mistake is stacking approvals too late. Once that happens, every other step gets compressed, and quality usually pays the price.
What drives banner cost
Buyers often ask for a price before the scope is stable. That’s understandable, but banner pricing is tied to decisions that affect material use, labor, and finishing.
The major cost drivers are usually:
- Material choice: Heavier-duty and wind-specific materials cost more than standard temporary options.
- Banner size: More square footage means more material, ink, and handling.
- Finishing details: Pole pockets, reinforced hems, webbing, and specialty hardware add cost.
- Installation conditions: Difficult access, lift equipment, and multiple locations increase labor.
- Volume and standardization: Consistent specs across a rollout usually simplify purchasing and production.
There’s also the hidden cost of poor planning. Rush production, emergency shipping, and redo installs can turn a “cheap” order into the expensive option.
Where budget decisions should be made carefully
Not every banner needs premium specifications. But some corners are expensive to cut.
Spend carefully on the items that affect field performance:
- Match material to exposure
- Choose finishing based on installation
- Use art files that print cleanly at scale
- Coordinate approvals before production starts
Save money by standardizing where possible. Reuse layouts across campuses or properties. Keep finishing consistent when the installation conditions are the same. Separate must-have banners from nice-to-have banners if the budget gets tight.
The least expensive quote isn’t the lowest-cost project if it creates reprints, delays, or installation failures.
A project manager’s budget habit
Create one working document with line items for artwork status, site status, permit status, production status, delivery location, and installer coordination. That single habit prevents many of the miscommunications that lead to surprise costs.
The goal isn’t to make the project complicated. It’s to make it controlled. Graduation deadlines don’t move, so the project plan has to do the heavy lifting.
Your Outdoor Banner Ordering Checklist
When the order is about to be placed, most problems are already visible. The trouble is that teams don’t always stop long enough to look for them. A final checklist keeps the project grounded in field reality instead of assumptions made during email threads and proof reviews.
Strategic checks before you approve anything
Start with the questions that define the project:
- What is each banner supposed to do
Welcome guests, identify the ceremony area, celebrate graduates, direct traffic, or create a photo backdrop. - Where will each banner be installed
Exact location matters more than general intent. - Who is the primary viewer
Drivers, pedestrians, arriving families, staff, or attendees already on site. - Has placement approval been confirmed
Don’t rely on verbal assumptions when multiple departments are involved.
If you can’t answer those cleanly, the order isn’t ready.
Production checks that prevent rework
Once the project scope is set, move into the production details:
- Material selected for the actual site condition
Standard temporary vinyl, heavier vinyl, or mesh should be chosen based on exposure. - Finishing chosen for the installation method
Grommets, pole pockets, or reinforced attachment points need to match the hardware plan. - Artwork supplied at print-ready quality
Logos, crests, portraits, and sponsor marks should be clean enough for large-format output. - Message hierarchy confirmed
The main line should be readable first, with secondary details clearly subordinate. - Colors checked for contrast
What looks tasteful on screen may disappear outdoors.
A useful internal test is simple. If someone unfamiliar with the project can identify the main message in a few seconds, the banner is probably doing its job.
Site and operations checks that teams often skip
These are the operational details that tend to cause last-minute stress:
- Installation date scheduled
Not just requested. Scheduled. - Hardware and access equipment confirmed
Ladders, lifts, straps, anchors, and site access should already be assigned. - Receiving location verified
Especially important for schools, churches, and multi-tenant properties. - Removal plan documented
Temporary signage should have an end date and a responsible party. - Multi-site consistency reviewed
Fonts, colors, and naming conventions should align across locations.
The final proof is not the final checkpoint. The site plan is.
The pre-flight standard
Before you release the order, one person should be able to answer these five questions without hunting through emails:
- Where is it going?
- What is it made of?
- How is it being mounted?
- Is it approved?
- When will it be installed?
If those answers are clear, you’re in strong shape. If they aren’t, pause the order. That pause is cheaper than reprints, rushed changes, or a banner that never should have been produced the way it was.
If you want a partner that can handle banner design, production, permitting, installation, and multi-site coordination without making your team manage every moving part, On Display Signs, Inc. is built for that kind of work. Their team supports organizations across the U.S. with end-to-end signage project management, including local code compliance and installation planning for complex outdoor banner programs.

